Tuesday, December 30, 2014

{ Painting Peg Board }

I really don't have a lot of time to do big projects but I did make some time this past weekend to paint the basement walls and paint + stencil some peg board to make this little craft room cute and organized. 


We have a few pieces of this peg board courtesy of my junk stuff hoarding husband so I thought it would be great to utilize it in the craft room. I can already picture all the little hooks holding up my sewing items to make things easy to grab and easy to clean up.

I painted it dark gray (the same color as the base of the floor) to begin with.

Then I took my stencil and some paint and made it pretty.


If you've stenciled anything before, you know it takes a little time. You have to let each section dry a bit before moving on to the next section. I stenciled the board in between painting the walls. I worked out perfectly and I really like the end result!


I brushed the paint on the board with a foam brush and only lightly brushed it on. I like that I can see the gray through the color and I like the imperfection of it all.


The room is really shaping up nicely. I'm still looking for a table like I showed on my mood board here so if you have one or see one, let me know.


One of my Christmas gifts was a rug and I am already loving it down here. 


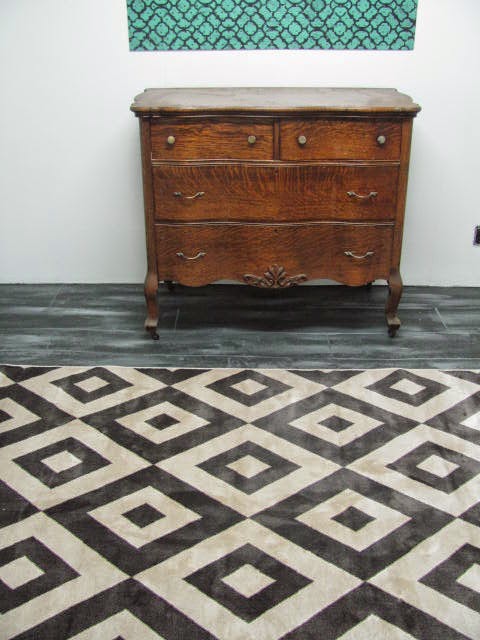
We were given that beautiful dresser from Marks mom and I have yet to decide if I want to paint it or not. I struggle with painting things that already are beautiful in color but this one could go either way. 

The walls were previously sprayed with primer and I painted them white on top of the primer so it doesn't look like much but it really does look so much better in person. A lot more finished looking. 

Here's a in progress shot and you can see the difference where the paint has been rolled on. 


I also painted the wall at the bottom of the stairs


Now I have to get rid of that terrible yellow on the stairway wall and paint up those steps too. Still a lot to do down there but it's really so much better than what it was the day we looked through the house. Just picture a bug and monster spider show, dirty beyond dirty and mouse poop everywhere and you've got in your head what I experienced when walking down those steps! I never would have imagined that it could be as good as it is now because the before was scary! 

Keep checking in because one of these days I will have it all done, maybe like a year from now haha but it.will.get.done. Someday!

Hope you are having a terrific Tuesday!


Sunday, December 28, 2014

{ Christmas 2014 }

Better late than never right? We've been crazy and crazy busy. Spending lots of time together, lots of parties to attend, lots of shopping. I always say I am going to get my Christmas shopping done early and then I never do and end up spending the last few days prior to the big day shopping and staying up way too late wrapping gifts. Like 1AM late for two nights in a row. Its all good though. 


We woke up Christmas morning and opened gifts with our kids. It is truly a joy to watch their excited faces as they opened gifts and to hear their screams of thankfulness upon seeing what was inside those packages. 


We had a wonderful time with Mark's family on Christmas Eve and then spent a relaxing day at my parents home on Christmas day. I didnt get any pictures on Christmas Eve since I forgot my camera. Only remembered to snap a few on Christmas day too. I am failing in the photo department lately. Here was our attempt at getting all five of the grandkids to look at the camera and smile at the same time. #fail #worksformethough 


Trev has really picked up on reading so he wanted to read the Christmas story to Papa.
 SO CUTE.


I got to take a nap in the afternoon and that in itself was amazing. We are blessed beyond measure with amazing family on both sides. Such caring, loving, and giving people. 


Our Christmas decorations were minimal this year and the mantel didn't get completed yet which is all ok with me. Having a perfectly decorated house for the holidays at this point in life is just not priority. Having quality time spent with family and happy kids knowing and celebrating the true meaning of Christmas is good for me. 

photo taken by Vision of beauty Photography 

From our family to yours we hope your Christmas was beautiful, peaceful, relaxing, and spent with those around you that you love! 

Be Blessed

Thursday, December 18, 2014

{ Basement Floor - FAUX wood }

I didn't necessarily plan to paint my Saturday away but that's what ended up going down and I am THRILLED to show you the result of my hard work! 

Last week I showed you that the walls had been sprayed and my inspiration for the basement. I wasn't really sure how exactly I wanted to paint the floors but I found this on Saturday morning and I was sold. I was looking for something easy to do but a little something more than just throwing paint down so doing a faux wood floor on the concrete was a perfect solution and I think I ROCKED it out perfectly! #PROUDMOMENT


Doesn't it look awesome?! Let me tell you, it looks even more awesome in person. I know I am bragging but seriously it was an all day project that turned out SO MUCH better than I was thinking it would. Plus it was a relatively easy project - other than the fact that it took ALL day but it wasn't that difficult to do.  I LOVE how it turned out! Check out the before and after below. 


All you need is paint, a paint brush, a paint roller, and a wood graining set (I got mine at Menards for under $4- see below). 


I got a gallon of black paint and I didn't even use the whole thing. You'll need white paint too but not very much at all so use whatever you have laying around the house or only pick up a small thing of it. 

First I vacuumed the whole room really well. Then I started at one end of the room by cutting in along the wall with the black paint. Then I painted a strip of black the width of the room. I had a separate bowl that I poured black paint into and then poured white paint directly on top of it and mixed it up a little. While the strip of black paint was still wet I took the paint brush with the mixed black and white paint and brushed it quickly and haphazardly onto the black strip. Then I took the largest wood graining tool and ran it along the strip to create the wood grain look in the paint. 


Once I had a few rows done, I took the paint brush and made a faint line between the rows and then did some vertical lines so that it resembled separate pieces of wood. 


After that it was just repeating the same process row by row until the job was done. 


Some of my lines aren't perfectly straight as you can see in the photo above but it really isn't that noticeable when looking into the room. My dad came over as I was finishing up and he thought we had put down tile in the basement until I told him it was paint, he literally had no clue! 


I painted all the way over just past the steps so that when looking down the stairs it looks seamless. For sure looks like we've got tile going on down there now! I'll probably do the rest of the basement someday but it's so full of stuff right now so that will have to wait for another day year lol. 


Just painting the walls, ceiling, and floor really took the room from blah to looking a lot more finished.


I plan to put a few coats of polyurethane down to protect the floor plus it will give it that nice shiny look too. 

The basement is really moving along now. Next up I will be painting the walls - which I realize I probably should have done before painting the floor but I guess that's what drop cloths are for right?! 

After painting the walls we will be ready for furniture. Finally I will have space to do my sewing and crafting! 

Do any of you that live close to me have an old wooden ladder laying around that you want to sell? I think I've found everything I want for down here but I'm still looking for a ladder like the one below. I NEED one. Can you help me out?


So what do you guys think? Pretty cool right?! I think so!
Here's a poll question for you...what do I do with the fireplace? Paint it? Leave it as is? Not sure exactly, because I don't think the brick looks all that bad but maybe it will look better painted...??? What would you do?


<< linked up here >>
<< linked up here >>

Friday, December 12, 2014

{ Farmhouse 38 | HOUSE CRASH }

I am a blog reading junkie. They should really have a group for people like me, addicts to looking at other peoples homes and stuff for inspiration that I'll probably never do myself so its mostly just a big time suck but I LOVE IT! I cant look away. Wont look away.

There are a few blogs that I read almost everyday due to the amazing content these peeps throw out. I mean, seriously, I don't know how they do it. #Jealous. 

Farmhouse38 is one of those ones that I go to often. Not only is the home renovation that they've done a.m.a.z.i.n.g but her creativity is off the charts and her photos tell all. The front of her home is adorable especially when you click down one more photo and see what it looked like when they bought it.


So cute right?!
 Not only did the outside get an amazing transformation but the inside is pretty great too. Check out their awesome kitchen below.


You'll have to go to her page to see what the before pics look like, it was a major renovation and the after photos are awesome!

 I love the cabinets that they have, and who doesn't love a farmhouse sink and check out that DIY back splash they did below. That is giving me some ideas...

DIY Herringbone Beadboard Backsplash from Farmhouse38


LOVE those bookshelves along the stairwell! Such a great use of space. And the painted stairs are pretty cool. Might have to do something like that for my basement steps.

After of Master Bedroom Makeover from Farmhouse38

I love her style of decorating. Very farmhouse but yet modern with a very cozy feeling.


I love her color choices inside and outside too. Take a look at their chicken coop below. Those are some pretty lucky chicks they've got! I want this in my own backyard, like yesterday. Now to talk Mark into it. Getting bunnies and kittens about did him in, so I'm hoping he'll be cool with chickens... Put in a good word for me will ya?

Chicken Garden and Coop from Farmhouse38

You can read all about her farmhouse coop adventures here! Her yard is pretty spectacular. So much cooler than I can dream of mine ever being like. I just don't have that creativity in me to think of creating spaces like she does. What an amazing talent for sure!

Do you guys get inspired when looking at other peoples homes? I clearly do, hence bringing you the "House Crash" series. I get all proud and excited when I see a home that screams awesomeness. There are millions of houses out there but it really takes a knack and talent to throw things together with our individual tastes and styles to make a house a cozy home. The things that go in our homes don't need to be pricey and top of the line, it can be vintage, garage sale finds or hand-me-downs and still be awesome and that's when I get all proud of someone when they can really pull it off using their talents, creativity, and imaginations!  While I am still trying to figure out exactly what my "style" really is, I will continue to be addicted to home design blogs, seeking daily inspiration for my own home!

Tuesday, December 9, 2014

{ Basement Family Room + Mood Board }

The basement family room/craft room has FINALLY been sprayed! 

We shelled out the $ to rent one of those big sprayers and Mark got the job done last week! It was WELL worth the price to rent the sprayer. The first round that Mark started a month ago, he used one of those manual sprayers and it worked but it was very time consuming and difficult to spray up at the ceiling. So he only did one coat on the ceiling and then it sat until last week. 

He rented the sprayer and did the ceiling again and the walls. 


Next up we have to put a coat of paint on the walls. The spray was just a primer. After the paint is up then we need to paint the floors with cement paint. We aren't going to put any flooring down in here since the basement is prone to getting a little water in it. I figured we would paint the cement and get some cute area rugs. That way if there is a threat of water we can just roll up the rugs and mop up the floor. 


The photo below is a PERFECT example of how I want this room to look!

Basement Ceiling Ideas for Remodeling Your Home : Art With Black And Beige Rug Also Craft Table Plus Basement Ceiling Ideas And Industrial Pendant Light Plus White Work Table And White Chairs Also Wood Floor For Contemporary Kids Design

Here is my MOOD BOARD! I love putting these together because it gives me a concrete goal of the things that I want to find/get.


1./ 2.3.4./ 5. / 6.

I LOVE a table with turned legs and would love to have something like that down in the basement. This room is going to be my crafting area so I will have to have a big table to do all the things that I love to do down there. 

Above the table I want to do the hanging ladder with lights. That would probably be my favorite part of the room!

I really like the black and white rug from the inspiration photo, and IKEA has that triangle one for only $99. I need to probably get two. 

Isn't it fun to think about what you want to do with a space. The hard part is finding all the pieces to put it all together especially on a budget! I know a lot of what we will do down there will be DIY and we will probably pick up a lot of the furniture from craigslist or garage sales so if you have any of the items above that I could use that you're wanting to get rid let us know! 

Wednesday, December 3, 2014

{ Coffee Station }

So if you cant tell by now, I like to jump around from project to project with out always giving you a final "this is done" post on things I've shown you. Like the basement and the shoe storage in my entry way. I will get around to showing you those some day. Maybe when they actually get done, how does that sound? We still need another coat of paint on the ceiling downstairs and the shoe storage has a few final things that need to get finished up and then I'll show you. I promise. 

Until then, I have been wanting to do a little coffee station in our new home for awhile now and finally got it done this week. Just in time for the holidays!

I don't drink coffee very often. Mostly only a cup a day and only on the days I go to work. I know-what's wrong with me-you are asking right? Even worse when I do drink coffee, what I should be saying is, I drink coffee with my creamer. I'm really trying to be more of a grown-up and use less creamer but I'm not there yet. So even though I don't drink coffee on a daily basis I like to have friends over for coffee. And it's cute so it needed to be done. That should be excuse enough. Plus it was an easy update to do so it moved to the top of my to-do list for the week.

My inspiration was when my good friend mentioned that she was wanting to do a coffee station at her new home. She saw this on pinterest below and wanted a sign like that for her home.

coffee-station

I told her I could make one of those "But First, Coffee." signs for her.

I sent it to her, she printed it off, put it in an adorable frame and here it is in her own home!
 Cute right?!


I liked the idea of having a little sign but I wanted something a little smaller. The one that my friend had printed is an 8x10. I printed a little different one out for myself that's a 4x6.

 I had this little wooden plaque that I had painted when I went to a chalkboard paint painting class. I thought that would be cute with the little sign on it, so I used a glue stick and stuck it right on top of the plaque.


I put up a little shelf to hold a couple of coffee cups ready to grab. The white jar was perfect for holding those creamer cups that I absolutely cant live with out. 


The little tray that the jars are sitting on is actually a plaque that I think looks really great as a tray.


I've been meaning to do something in this corner for awhile now. Truth be told, this little corner of the counter was home to my bread maker for the last couple of months. I don't really have a great place to store it other than down in the basement and I'm too lazy to bring it up and down the stairs every time I want to use it, which is a lot lately. But it finally had to be put away so I could do the coffee station and I'm really glad I did.

I started pulling out a few of my Christmas decorations and I think the red wire tree looks pretty cute sitting next to the coffee station. I love Christmas decorations and have realized that I don't really have a lot of them. I'm going to have to change that over the next couple weeks and maybe hit up some of those after Christmas 90% off sales at Hobby Lobby. Side note: I swear I could spend hours in hobby lobby. They have everything!

So that's it for my little coffee corner, but here are a couple more really cute ideas for making a simple coffee station on your counter.

Get Inspiring Stylish Home Coffee Station Ideas Pictures9

coffee station

coffee, coffee cups, coffee station, chalkboard paint, K-cups, cuisinart
If you are thinking that you like either of the coffee signs above, I've included them below plus an additional one for you to print off and enjoy in your own home!