Thursday, June 26, 2014

{ The Kitchen Today }

You'll all be happy to hear I'm feeling a little less crazy today! I was in a cleaning mood this morning too so I figured I would take some pictures of the kitchen while it was at it's best. Let me tell you a little secret, it NEVER looks this clean and clutter free. This was a clean and "staged" photo session, we actually live here with chaos and kids so don't think for two second that I have it all together because that "clean" look lasted about 5 minutes! So now on to the photos...


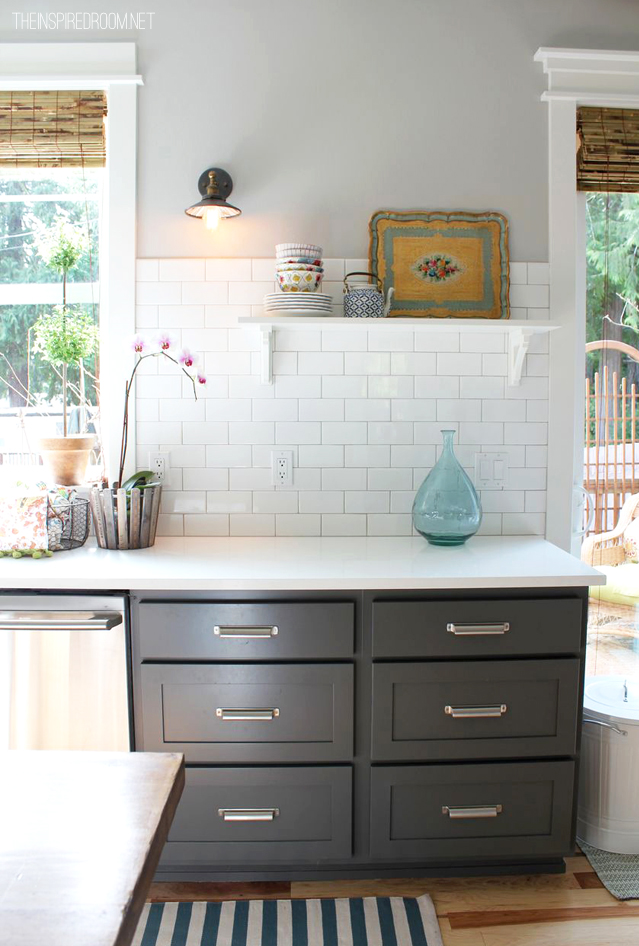
I think you had a quick glance at the new microwave and the shelf above it in the last kitchen post. I wanted a shelf and Mark gave me a shelf, it is perfect! I still haven't really decided what I want to put up there yet but for now it is home to two of my flee market finds (a cake stand and white wire bowl) and a cute cookie jar I picked up on clearance at Target. 

The shelf is pretty basic and I painted it the same color as the cabinets including the wall in the back to give it that complete "built in" look. Here's a couple quick phone shots while he was building it.


Below is a comparison of with and with out the microwave and extra shelf. It really makes that side of the upper cabinets look more complete. Plus the hardware really helps to make it all look a little more finished. 


We still have a few things we want to do with the upper cabinets. Remember that little 5 inch spot on the end? We're not sure what we want to do there yet. I think it's too small for one of those spice rack things and it's too small for a stock cabinet so if we wanted a tiny little cabinet it will have to be custom built. The other option is to just put a panel there and block it off completely to give it a more finished look. We also want to add crown molding up on the top.


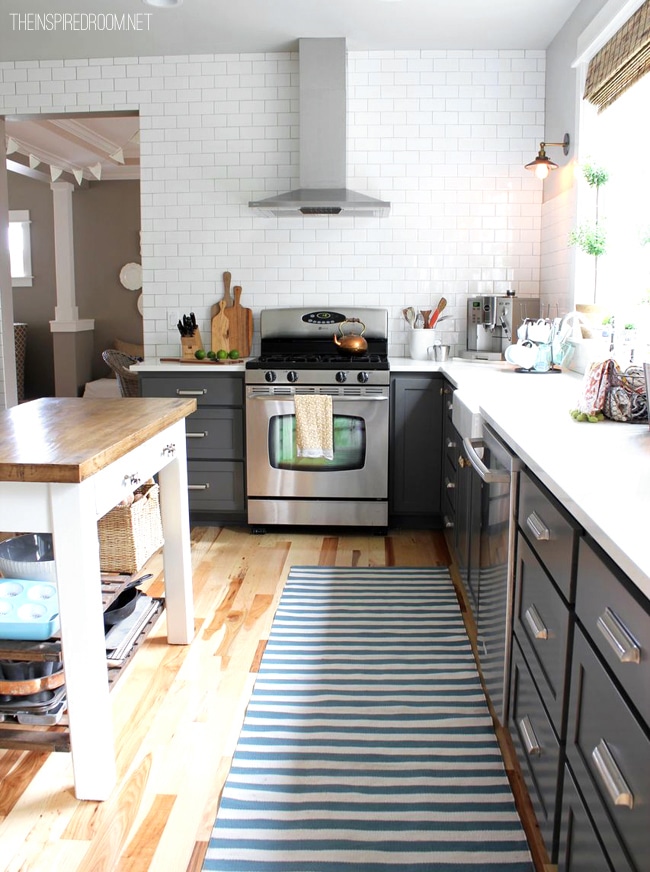
I am LOVING cooking and baking with a center island. That says something because if you know me and if you don't know me, now you know, I really really don't like cooking. Like at all. I love to bake, I could bake all day long, and do sometimes, but cooking meals and stuff like that, not so much my thing. But cooking and baking is SO nice in THIS kitchen. It is really functionable with the island and the layout and I am extremely happy with everything that we decided to do in here.


Here's the side of the island. I don't think I ever showed you the detail work Mark did. It really makes the cabinets look more custom. I absolutely love it!


Mark thought to put an outlet on the end too and it sits right at the top so it's hardly noticeable but highly useful. I've used that thing a lot already!


The ends of the cabinets against the walls have the same detail too.


The outlet was a little too close to go right down with the trim so Mark cut around it. Handy guy he is!


I don't think I showed you the table and chairs yet either. We used to have a counter height table and chairs set (which is for sale by the way if you are looking for a table). We loved our old table and having 8 chairs was awesome but we just didn't have room in this house for it so we went to Ikea and got a long and skinny table to go in here. 


It extends even further out so when we have lots of people over we can still accommodate 8 people around the table. Right now we have it pushed up to the window. This allows us to have the most room during every day use because this room is really small. Here is what it looks like with it pulled out and you can see how little space there is between the island and the chairs. 


See what I mean. It's a little tight. It works but for now we like it to be pushed against the windows. The future plan is to build a bench along the window side that accommodates the table being pushed in and out from the wall. Lots of kid butts can sit on a bench which will be nice when the kids have friends over but when it's just us we will still be able to push the table back toward the windows to have maximum walking space in the kitchen. 

Did you notice we have the old fridge out on the deck still. I don't know why but we seem to move appliances out to the deck and that's where they stay until we finally get time sick enough of seeing them to move them. Clearly we have our priorities in order!


Back to the table and chairs...
We purchased the two end chairs at Ikea and the four clear chairs are called ghost chairs. These are great for small rooms so the room doesn't feel too "full" with chairs in it. These ghost chairs are great to have with kids because they are so easy to wipe down. I really like them a lot. Mark is indifferent. I got them for a really great deal too because these are factory defect chairs, meaning they have tiny flaws (that I cant even really see) so I could snag them at a fraction of the cost!

The end chairs are SO comfortable. If you are looking for a relatively in-expensive nicer chair Ikea is the place to look. I am thinking of stenciling a pair of slip covers to have for a pop of color. Did I mention these are fully removable slip covers that can be machine washed?! Yep, that's why I was ok with getting white!


Did you notice the big dining room light in one of the photos above? If you follow me on Instagram, you already saw this. Isnt is cool?! That was another Ikea purchase. It was around $20 too so even more exciting when you know the price tag. 


Here's a shot of the other side of the room. The pantry cabinets are back on and the trim has been put up around the cabinets and the doorway. 


We want to get a cabinet for above the refrigerator and then Mark will construct something around the fridge to make it look built in. For now it sits there and the top of it gets to showcase my mixer and other things that I don't have homes for yet. 

When I look around this room I am still amazed at where it is now compared to what it looked like before. Amazing really doesn't cut it when describing the transformation that this room has undergone. My hubby is the BEST and has worked so hard to make this room into the vision that I drew for him on a piece of paper almost eight months ago. 

Here is a quick comparison of what it looked like before and then now.


If you missed the posts about the kitchen renovation you can see a few of them here and here.

Thanks for stopping in and checking it out! 


Shared with The Shabby Nest
Shared with Coastal Charm
Shared with A Stroll Thru Life

Tuesday, June 24, 2014

{ Getting It Off My Chest }

I am venting here. Just venting in regards to moving and cleaning so if you care to read on and hear me whine then by all means please do but if you don't want to sit in on my pity party then click here to check out Kelly's beautiful Michigan home. I read her blog often and figured I would share since I've got nothing to show you today other than my negative attitude. 

I am struggling to keep this house clean. I try to organize/sort/put away something on the days that I am not working but it never seems like anything gets accomplished. It's been hard because we still don't have everything out of storage. On top of that we need shelves and baskets to store things on and in so for now a lot of stuff sits out. There is minimal closet space in this house and the hallway closet is a decent size but doesn't have any shelves in it. I am going crazy. I'm grateful to be "moved in" to our house but when everything seems out of sorts it's hard for me to live there and be content. I feel grumpy a lot and overwhelmed and I would rather sit on the couch and just pretend I don't see anything than get up and do something. Am I crazy? Do you all feel this way when things are a mess or should I be seeking some sort of medical intervention?!

 I've really been asking myself too, why do we have so much stuff. Seriously. These things I am not willing to part with (for now) but geesh the amount of kitchen small appliances and kitchen items are ridiculous. All these things have a purpose and a time but not used frequently enough so they need to be stored in between uses. You know what I'm taking about, the toaster, the coffee maker, the waffle maker, fondue set, large pot for canning, the blender, the tea pot, the mixer...and on and on and on... I am now starting to feel the small-ness of this house. There is not enough room for everything. 

We have the basement that we can put things in but there are no shelves down there either. We cant put anything on the floor or near the walls because the walls are disgusting and the floor is wet since our basement apparently leaks water when it rains like it has been. Can you sense my frustration? I really am only writing this for myself. It feels good to get it out, hence the "getting it off my chest" title. The other problem with the basement is that it still isn't cleaned out enough to have our washer and dryer down there yet. I am having to leave the house multiple times a day to go somewhere else to do laundry. This sucks. For all of you without laundry in your own home I salute you. What are your tips? Buy more clothes so you don't have to wash as frequently? Then I would have more clothes to store so that's not going to work here for me.

Another thing on the list that I've been struggling with is feeling "at home" with these wood floors. I feel like my feet are always dirty. I feel like Chase is always hitting his head on the floor. I feel like I have to sweep every five minutes. I hate sweeping over and over and over. The solution is probably to buy more rugs. That will come when I have funds to buy more rugs (dang expensive rugs!). Another thing that will help is when we have a paved driveway and garage. The dirt gets brought in all.day.long by all of us coming and going. Maybe we need to start using the front door to enter the house and create a "drop zone" with shoe racks and a rug and a bench or something. Anyone have a bench they want to part with? Do you guys have any tips for living with hard wood floors? What are your cleaning routines?

ALL of my complaints are so small and really most days I am ok but today I am feeling it. It's probably because I've been overwhelmed and way too busy and it all adds up yet. It's mostly because on my days off I would rather be doing fun stuff with my kids and our friends than cleaning and putting things away. I just need to get my butt up off this chair, stop writing to you about how un-organized I am, and start organizing! I know, I know! 

If you are sill reading, you may now need to go check out Kelly's home tour because now you need something happy to think about after all my complaining! 


Tuesday, June 17, 2014

{ Moved IN }

You may or may not already know this but...WE MOVED IN!!


We have stuff EVERYWHERE. Here in boxes and in the barn, stuff at my moms, boxes at my sisters. It's crazy how un-organized everything is but we are HAPPY to be here and all together again. We've had breakfast together, dinner together, baked together, cleaned, played, had lunch play-dates and have been ENJOYING living in our own home in the short week and a half that we've been here!


Chase took his first "walking" steps (walking with the play toy) last week! We have so many firsts to live here and so many memories to build in this little house of ours and it's finally time to start making those memories. Even though things are un-organized and un-finished, projects will continue to get done as we live here and it makes it so much easier to actually live where we are working.


It is like Christmas day every time we un-pack a box. Especially the boxes with toys as you can see in the photo above.

I also was able to buy a mirror that is practically exactly what I was looking for in the bathroom. It had stickers all over it so those quickly got scraped off and I want to eventually paint it a bold contrasting color but I have yet to decide what color I should choose. Any suggestions?

 
We are so thankful for all the help that we've had thus far on our home. We have the BEST family and friends and truly appreciate everything that everyone has done for us.

We have lots to do and lots of projects to accomplish and will continue to share those each week. Thank you to YOU for tuning in and sharing along with our progress and updates too. I love running into you guys and hearing how you enjoy reading the blog. I've loved being able to capture our remodel and share it with all of you!

Stay tuned for a big update on how the kid's upstairs room has turned out. I absolutely LOVE their room and thankfully they seem to really like it too!

Friday, June 13, 2014

{ The Island Goes Dark + House Crash- Kitchen Edition }


Have any of you been just dying to see the painted island?! Maybe it's just me that gets all giddy about things being painted. I'm clearly high on paint fumes since I've literally been painting for the last 6 months so forgive me if I am little crazy lately!

 If you have no idea what I'm taking about you can see the last post about Mark's craftsman skills and the custom island he built. 

I started off using a friend's paint that she had bought but didn't need and gifted to me. It's a really pretty light gray color, just not the color that I was going for. 


I didn't know it until I got a little on and stepped back to see if I liked it. It just wasn't what I had in mind, I was thinking of going much darker so I was on the hunt then for the perfect darker shade of gray.


Before I show you my island, I have to give you a little back story on where I got the inspiration from. One of the many blogs that I follow is this one. Check out Melissa's beautiful kitchen below.
benjamin moore gray kitchen cabinets
Melissa has a gorgeous home and her kitchen renovation is amazing. The thing that I love is, her before kitchen is just like so many of our kitchens. A nice kitchen- just very basic, builder grade and slightly hard to maneuver due to the L shaped layout. We had that layout in this house and it didn't work for us either. She took her kitchen from nice to Niiiice and now it's an extremely functionable, working kitchen.

The thing that caught my eye when I was perusing her kitchen makeover for inspiration was the color of the base cabinets. That is EXACTLY the color I was imagining for my island.  

gray kitchen cabinets

I quickly found where Melissa referenced the color on her post about her cabinet colors and went out and got some of that paint for myself. It's called Kendall Charcoal by Benjamin Moore in satin finish.

Here it is on my own cabinets


I am in l.o.v.e.
It is absolutely what I had in mind and I get so excited when what I have in my mind plays out in real life. Don't you love when that happens?
 What do you guys think? Ready to come over and have coffee with me yet?! Wait, I cant find my coffee maker yet amongst all the boxes. Give me a few more days, then maybe I'll locate it.  #hoarder

We put the pulls on the cabinets too and LOVE them (I know right, I LOVE everything... remember what I said about paint fumes = crazy?!).


It's like icing on the cake. These pulls complete my cabinets. It really pulls (no pun intended) the whole kitchen together and makes it feel more "done" if you will.

We never had pulls or knobs on our cabinets in our previous house and I have no idea why we never did. They make opening the cabinet easier (duh!) and they look beautiful.

We still have to add some accessories here and there but it's evolving quickly into the kitchen of my dreams (literally I dream about this house crap which seems like fun but sleeplessness is not good for me, especially when my two year old is getting up at least 3 times per night now that we are in a strange new house- that's a post for another day).

The "to-do" list keeps getting shorter for this room which is pretty exciting! The things still on the list are crown molding on the cabinets, one more coat of paint on some of the custom built parts of the cabinets, buying an above the refrigerator cabinet and painting that, tile backsplash, trim paint, and wall art/decoration

Just enough to keep Mark and I busy! I am hoping to have everything put away in here next week so I can give you a whole room tour! If you follow me on Instagram you probably already saw the new dining table light that I (you guessed it,) LOVE! 

Have a great Weekend guys!!

Tuesday, June 10, 2014

{ Chalk Paint Class + GIVEAWAY }

**UPDATE: The Winner of the Giveaway, randomly selected via Random.org is comment #3, Cassiekendra@gmail.com
Congratulations!!


I had every intention of getting this post up over the weekend but we were CRAZY busy with moving things in, organizing, rangling kids, and having a yard sale all at the same time. I appologize for teasing you all with a giveaway over the weekend and then not following through. Thank you for your patience... read on for the giveaway details!

I had the pleasure of meeting Tricia Daniels, owner of Pretty Little Things, a couple weeks ago. I took her chalk painting class and LOVED it!


 Have you guys painted with chalk paint yet? I just may be hooked people. Seriously this stuff is pretty amazing and I've been fighting the urge to drive down to Lowell to pick up my own Annie Sloan chalk paint and paint EVERYTHING I own. I can hear my dad cringing now (some people do NOT like wood to be painted over). Dad's going to have to get used to the idea because I'm all in on the painting wood trend! 

The nice thing about chalk paint is that you can pretty much paint anything with it. Plus NO priming. Hello! Wood, plastic, metal...you name it! I know you can get other brands at closer locations but I want to try out Annie Sloan products on my living room furniture. Mostly because Tricia highly recommends Annie Sloan paint and wax but also because I heard the shop owners are pretty great and super easy to work with. So a little road trip is in the cards for this week (hopefully).

The class I took was a lot of fun and really informative! Tricia is so sweet and I really learned a lot, not only about chalk paint but about different wax options, luster dust, distressing, layering, and all the other things that you can do while using chalk paint. Tricia shared some of her tricks and tips as well as do's and donts which was really helpful too.
Plus my sister was able to go with me and we made a girls night out of it, here she is painting below. My sister is pretty amazing. If you'd like to read about her battle with epilepsy you are welcome to follow along on her blog here. She is inspiring and strong. I am blessed to be able to spend time with her any time I can!


The piece below is one that Tricia painted right in the class. The top is sanded to look like wood grain. The end product was gorgeous! 


I have a few pieces from my old living room that I want to use chalk paint on. I will hopefully get to that sometime next week or the week after and share the finished project with you all when I'm done with that. Have you guys used chalk paint yet? Share your tips and brands in the comments for me if you have any recommendations or just great advice too.

Tricia paints and sells some pretty amazing pieces over on her facebook page Pretty Little Things. If you guys are in the market for furniture make sure you check out what she has available. You know painted and distressed furniture is THE thing right now! If you're not in the market for new furniture, Tricia will also custom paint your furniture for you. So keep that in mind when you look around your living room or your bedroom and think your furniture is looking like it needs to be replaced, sometimes it just needs an update and then it feels like a whole new piece! 

These are just some of the pieces Tricia has painted


Gorgeous right?! Look around your room right now, you can update your furniture with some paint and it is a drastic change. If you're not into painting or don't have the time you should consider getting a quote from Tricia!
 
Check out this before and after...
 
 
If you guys ever get the chance to take a chalk painting class, I say do it! Tricia really knows her stuff and taking the class really opened my eyes to new projects! She is holding a BYOF "Bring Your Own Furniture" class later this Month which is a great way to get your own stuff painted without having to go out and buy all the stuff, so check out her facebook page to get all the details and information. You can email her with questions too at tricia.daniels@gmail.com.
Here is the GIVEAWAY...Tricia is offering a $50 gift certificate toward any finished piece she has for sale or toward custom finishing one of your own pieces. If you were on the fence about getting something or having something painted NOW IS THE TIME!
To enter to win:
Head over to Tricia's facebook page, Pretty Little Things and "LIKE" her page. Once you have liked her page, leave your email address in the comments section on THIS POST and you are entered to win!
Details: This giveaway closes on Sunday, June 15th at 8pm.  Only one contest entry per email address.  The winner will be chosen using Random.org and will be announced in an update to this post the following Monday morning. We will email the winner directly, so please make sure you use your regularly checked email address.


Thursday, June 5, 2014

{ Hiding the Shower Rod Brackets }


I almost labeled this post "ripping up the bathroom- part 3" since we already had a part 1 and part 2 and I am about to show you how Mark tore out some of the subway tile in the bathroom that he JUST installed. Don't freak out yet, nothing crazy happened, well except for the fact that we don't seem to plan ahead but it's really not that bad to label it as "ripping up" so instead I said hiding the shower rod brackets because that's exactly what we did and we are SO happy we did! 


I mentioned awhile back that Mark had made the shower curtain rod, which is actually pretty great and saved us A LOT of $. The only problem - the brackets were really large and (in my opinion) sorta ugly, although Mark said he would have made it look good. I am sure that he would have but when he came up with the idea of tearing out the tile and putting the bracket BEHIND the tile and then putting everything back together again, I was a little nervous about him ripping out what he just put in but I was sold on the idea of not seeing the huge bracket.

Here's a shot of the left side with the four pieces of tile removed


He cut a hole for the bracket to fit into. See- that bracket would NOT have looked very good on the outside of the tile, am I right?! Plus this shower rod is going to be strong, that sucker is bolted directly into a stud and isn't going anywhere any time soon.


The whole thing got covered in mud


We only had to replace a couple of the tiles since most of them weren't damaged after Mark dug them out. 


Mark grouted it the next day


The sides needed to be re-caulked and the replaced tiles needed to be sealed and then we were good to go.

I was anticipating seeing the curtain hung up so I got right to it after the sealer was applied


The curtain is from Target and it matches perfectly with the wall/ceiling color. 


This corner tub/shower is AWESOME. Seriously I'm loving it!

We finally picked out a light fixture and Mark's dad installed it


I am still on the search for a mirror. Something like the one below. Do any of you have one like this that you want to get rid of? Contact me if you do, I would gladly buy it off you!

When I think about what this bathroom used to be like and then I look at it now I am SO grateful that we've been able to do everything that we did in there. It's still a VERY small bathroom but by extending the wall out and removing the corner cabinet it really helped add a lot of usable space. 


SO MUCH has been done in here. Everything is completely new and it's so beautiful. It will look even better once we get some things up on the walls, rooms always feel more "homey" when decorations have been placed. 


Now that the shower curtain is up, which is one of the things we were waiting on to officially move in, we are well on our way to calling this our home. I've slowly been unpacking things and putting them away over the week and we will continue to do that over the weekend. 

I've got a great giveaway for you guys that I will post this weekend so look for that soon!