Wednesday, July 30, 2014

{ House Crash - Vintage + Industrial }


Hey Guys! I am excited to share today's house crash with you. This house is truly original, inspiring and pretty cool to look through. It's totally different than my style but there are so many things that I love about this home that I find myself perusing her house pics over and over!

Welcome to Mandi's house that she shares with her hubby and two daughters. Check out this entry way and that purple chandi with the herringbone painted ceiling...

Entryway Makeover Ideas 1

Crazy fun, right!? So many different styles going on in that small space but it all works together and that is exactly how the rest of her house feels (through the computer screen anyway ;)).

and the living room...

Living Room Makeover @ Vintage Revivals

I love the shelves on the wall, all the art work and that pattern of triangles is NOT wallpaper, it was made with a sharpie! Yep.

Check out this little girls AMAZING room

Dylan's Dream Room Makeover Hexagon Wall @ Vintage Revivals-2

I have kid room jealousy when I look at this room. That tufted headboard, those adorable pillows, that lamp, the wall, ALL.so.cute! Maybe you are looking at it and thinking, whoah, too much, but this screams I'M AN AWESOME KID to me! I completely love it and I can imagine her daughter really loves it too. The other side of the room is just as fun...

Pink Wall Little Girls Room @vintage revivals

that is one lucky girl and one super crafty, awesome momma! That's what I love the most about reading Mandi's blog, she DIY's almost everything and a lot of the items she has in her home are from thrift stores. She has a lot of great tutorials and projects that you can look through too. Click here and it will take you right to her projects page! Just to warn you, you may need a couple of hours of uninterrupted computer time because once you start looking you cant look away!

Here is a view from the kitchen into the dining room. This photo was taken during their kitchen renovation that wasn't completed yet at the time. I love the bold risk of painting black on the dining room walls. I also really like the herringbone pattern in the flooring!
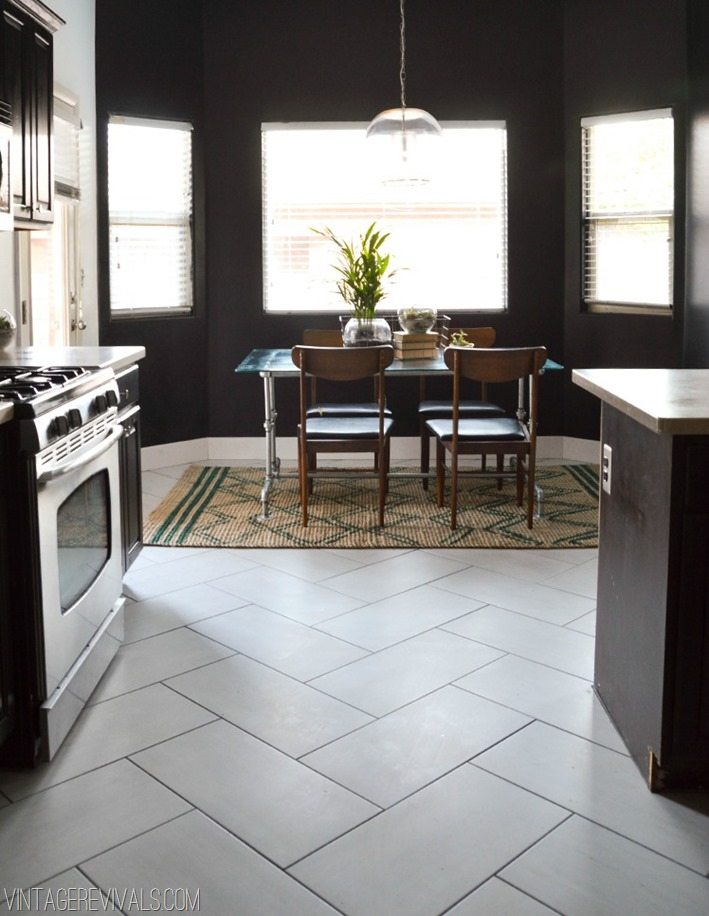
Herringbone Tile Floor Pattern

So, what do you guys think?! This girl has some spunk in her style, no?! Did you find yourself inspired?  If you want to see more, you can head over to Mandi's blog and see more of her home and other homes that she has decorated too!

The great thing about reading all these different blogs like I do is there are so many different styles out there, so many different tastes and preferences and ways to do things. It's a great way to find ideas for your home or even just to change up your thinking a little bit sometimes! We get so used to seeing our friend's homes and family's homes and tend to lean toward what we feel is safe but sometimes its just seeing what other people do and how they decorate that gives you that motivation to be bold and do things the way you really love, to think outside of the box, and see things you never thought possible before.

 I am still slowly trying to figure out what it is exactly that I love in terms of styling my own home. Sometimes, I figure it out after I purchase something and put it in the room and go "nope that didn't work out like I thought it would" but sometimes it's the unexpected that really pops in a room and screams "YES! That is what I was going for!"

Now I feel like I need to go hit up the thrift stores to see what kind of treasures I can re-purpose for my home! Thanks for the inspiration ALL the time Mandi!

I hope you guys like these little house tours that I try to do occasionally. I have SO many more houses to show you, some of them are people in my own backyard (not literally, you know, just those folks that are here from the Mitten like me) that I am excited to show you! Like I said before, if you or someone you know has a home that NEEDS to be shown off to us nosey house loving and inspiration craving peeps then be sure to contact me to get on the list!

I am doing a giveaway in the near future so stay tuned for that...coming very soon!

Hope you're having yourself a very happy Hump Day!

Sunday, July 27, 2014

{ Sew This! | Removable Pillow Cover }


So, I tried making one of those "easy to sew dresses" one time a while ago and sewed the bottom of the dress closed. I wouldn't say I am a good sewer by any means. Seriously, these patterns that you can buy are difficult to read for me and I have very little experience under my belt with anything sewing related. I really only know how to use my sewing machine in one mode and that's because my friend Sara (who's a sewing genius) set it all up for me. Ha! 

If you are looking for a quick updated look just by changing out your pillow cover and want one of those really easy sewing projects to do then this is the project for you! I mean it when I say its easy too. If I can do it, you can do it for sure!


First you need to measure your pillow. Mine was 18×18. I used two different fabrics. With the chevron pattern I cut out a 19×19 piece (the extra inch is to allow for seams). The other fabric I cut out 21×19 piece. This one has to be a little longer so you'll have an envelope enclosure pillow cover. Cut that second piece in half. You can see my pieces above all cut out.

Next, you'll want to fold over and iron the edges on both sides along that middle cut line of the second fabric. Once you have folded and ironed, sew a straight line all the way down

After you've sewed a line down each side you will take those two pieces and place one side about 2 inches over the other piece. This will be the envelope enclosure. Make sure both sides are laying with fabric right side up. This will now be a 19×19 square.


Lay the other fabric (the chevron in my example) right side (meaning the side with the pattern on it) down so it's facing the right side of the bottom piece. Next pin all the way around the square.

Sew a straight line all the way around the square.


Turn the pillowcase inside out or in this case right sides out and VIOLA! You have yourself a pillow cover that you made yourself!


Here's my plain black pillow that I've had forever and then now with the new two sided cover. That Damask fabric really hides the fact that there's a seam down the middle. The envelope enclosure is nice because you can take it off to wash it or take it off to switch it up as your styles change.


Here it is on one of my ghost chairs. I love it and it was such a quick and easy project to do.

I want to point out too, I finally hung some frames up on one section of wall in the kitchen. You can see it just beyond the chair in the photo below. 


These are all frames and photos that I had hanging in our previous house so I do need to update the photos. The top right frame still needs a photo in it. Trevor said to me, "mom, who's that lady at the top, I dont know her?" LOL, I laughed and said that's just the photo the frame came with! I really love having these photos up. It feels more and more like home as we add personal items. I really like gallery walls so this is my mini version of one for now. I plan on doing a large version somewhere in the living room some day. 


So what do you guys think, was that an easy pillow or what? If you have any questions about what I did feel free to ask in the comments section below and I will be sure to answer.
 The next couple weeks we are planning on cleaning out our basement, bug bombing, painting everything and moving our washer and dryer in so if you have any tips on cleaning nasty basements or using a paint sprayer or have any tips about bug bombs, share away, we are going in pretty blind and hoping for the best so any advice would be greatly appreciated! 


Tuesday, July 22, 2014

{ Making Memories }

 If you are an Instagram follower then you already know that we were gone camping over the weekend with some of our best friends. We absolutely love camping especially when we are with great people and have beautiful weather. There is literally nothing else that I would rather have done last weekend than spend time with these friends of ours!

There were 10 kids and 7 adults.The kids ranged from 8 years old and down and they had SO MUCH fun together! (two aren't shown in the photo below)


Just look at all the smiles!


We stayed at Meinert Park in Montague, Michigan. It is a really nice, smaller park and only a short walk from beautiful Lake Michigan. We spent two of the days at the beach. The kids loved splashing in the (freezing) water, playing with the sand toys, and walking along the beach!


And of course if you go to Lake Michigan you HAVE to sit and watch the sunset. THIS IS A MUST DO. Sometimes I think we don't know how lucky we are to be able to watch the sunset go down over the lake here. On this night, God painted the sky beautifully for us.


When we were walking back the kids decided to have a race up to the top. They drew a line in the sand and all lined up.

Ready.... Set...

GO!

They got in LOTS of bike rides to and from the beach. There is a large hill that goes down to the beach from the campground and the kids were challenged to ride up the hill without stopping. Only a few of them were able to do it on the first try. After a couple more tries everyone was able to make it up the hill at least once. They were all so proud of accomplishing that goal and it was great seeing them encourage one another. Like literally screaming "You can do it!" and cheering. It was adorable!


The park has a tiny playground just before you get to the beach. We almost walked past it because it was barely noticeable since all the beach grass was grown up so tall around it. Clearly not a main attraction here at this park!


The funny thing about that photo above is THERE ARE KIDS on all four of the swings but I couldn't see them due to the grasses being so high! The kids loved it though!

"Friends are the chocolate chips in the cookie of life."
- Unknown 


On our last night we drove into Montague and had ice cream.

The kids learned how to play leap frog (which was hilarious to watch)

 and of course...where there is a hill, rolling down it MUST happen!


We had such a fantastic weekend. THIS is how memories are made!


Not only did the kids have a great time but us adults did too. We got to sit around a campfire each night to talk and laugh, the dad's got to play games, and the moms got a little time to go on a run. We took lots of walks, made lots of yummy food, and had an all around great trip! This is one trip that I hope we can make a tradition of repeating each year. I really am so blessed to have these amazing friends of mine and really happy that we can spend quality time together making memories! 

I have the BEST girlfriends in the world. These girls are so supportive, encouraging, fun, and real. We talk mommy stuff, share life moments with each other, help one another out when we need it, and sometimes get into some trouble too! I am lucky to have known them since high school and still have such great friendships after all these years. We've lived states apart at times and we can always pick right back up where we left off and that is why our friendships work. We don't expect a phone call each and every day but when we do get time to chat or get together we always have the best time. So not only did the kids have a great trip and lots of fun things to do but I got to spend time with some of my best friends and I call myself lucky for that!


 A friend is one that knows you as you are, understands where you have been, accepts what you have become, and still, gently allows you to grow. – William Shakespeare

Hope you all are enjoying your summer too! 

Monday, July 14, 2014

{My 1st Homemade Freezer Jam }

Last week I made strawberry freezer jam for the FIRST time. Apparently I am the last person to ever make this stuff because everyone that I tell says "I make that all the time, isn't it so easy?" YES!! It is so easy. WHY did I wait so long to try it myself? 

When we were gone camping we made a day trip into Traverse City and stopped at a u-pick strawberry farm on our way back to the campground. It is so beautiful there. A perfect day for picking too. Just look at that sky!


The kids loved it and we got a little under 15 pounds of strawberries. I think we only came home with about 8 pounds though because the kids munched on them the whole night!


I've been wanting to making jam for a long time but I just never got to the strawberry fields AND to the store to buy what I needed in the same time frame to get it done. This year, I purchased the freezer jars and pectin back in February when I happened to see them on sale because I knew that I would forget about it when it was actually time to buy them. I was prepared THIS time!

I didn't have a go to recipe since I've never done it before so I googled for one. I found this one and went with it. I wont repeat the recipe since you can find it on that website and everywhere else all over the Internet, all you need to know is you need strawberries, sugar, pectin, and storage jars.


I used the 8oz jars made by Ball since they are so easy to use and perfectly sized for jam. I cleaned off the strawberries, blended them for a minute in the Ninja, poured them over the mixture of sugar and pectin, mixed and then let it sit for about 10 minutes. After it thickened up a bit, I used a funnel to ladle the jam into the jars. I let the jars sit out for about 20 more minutes and then popped them into the freezer.


This recipe makes 5 full 8oz jars of jam.


I know there are so many ways to do freezer jam and this non-cooking method is a lot softer set which is ok with me because my kids love jam on their pancakes and toast so it's nice to practically pour on top and then spread. Next time maybe I'll try the cooking method to see which way I like better. What do you guys prefer? Do you have any special ingredients or tips for this new jam making lady? If you do please share!

I had just under 4 quarts to start with. The jam recipe only calls for 4 cups of mashed strawberries so with our remaining strawberries we made smoothies! My kids LOVE smoothies and I try to make them at least once a week. It's an easy way to sneak in healthy stuff with out them ever knowing. I have to do it that way because these kids are picky picky!


This particular smoothie had strawberries, banana, flax seed, honey, yogurt, and ice in it.

Until Mark came in and wanted to try mixing some chocolate almond milk in his to see what it would taste like. From the sounds and squeals from Mark the kids it was like hitting gold. I didn't try it but I can tell you that three of my family members thoroughly recommend it!


Next up on my jam making adventures is to try black raspberry cooked jam. We found a bunch of black raspberries out in our field so this week we will be out picking and getting ready for a new jam adventure.

I wanted to share my tiny little project with you that I did last week too. We've been really lazy in the projects department lately that this is literally all I've done for about two weeks other than organizing here and there. It's so hard to want to be in the house working when it's so beautiful outside.

So in my last kitchen post, I showed you a lot of the kitchen but there was something that I was purposefully not showing you 


See in the photo above, I never showed you the bottom of the island...because it looked like this


We need toe kicks installed on all the cabinets. The old cabinets have the gross old toe kicks still on so from the photos you cant really see how bad they are but this island raw wood look was starting to drive me crazy. Something temporarily had to be done. I had some chalk paint left over from our chalk painted Lego table so I got it back out and put one coat on the island base.

So.much.better.


Sorry about the blurry pictures but I had to use my phone because my camera batteries had died and no replacements were to be found. But you get the picture right. It's the tiniest little change but I notice it EVERY time I walk into the kitchen so for me it's a huge improvement. Eventually we will have real toe kicks to replace this painted version, toe kicks are just basically a piece of trim, and they look so nice once installed.

So that's what I've been up to. Mark's been out in the barn organizing his junk treasures. I should snap a few photos of the barn sometime so I can show you how kinda cool it is and what we want to do with it. Right now you wouldn't be able to see past the piles of stuff. Someday I will show that to you, I promise!


Monday, July 7, 2014

{ House Crash - iheart Jen's home! }


I thought I would share one of my FAVORITE bloggers home today. As I said before, I get so much inspiration from other bloggers and I am completely obsessed with looking at other people's homes. Not in a creepy sort of way, just in that I am interested in home layouts and decorating styles. I've always been this way. My brother calls me nosey, I like to call it curious! Who doesn't like to see a well styled, well thought out and functionable home. Whenever I am at the home improvement stores, I pick up those giant books of house plans. I have done this for as long as I can remember. My pile of house plan books is a little ridiculous but it's my hobby! Maybe you don't care, and if you don't, well then my friend this is not the post for you, but if you are like me then keep reading because you are in for a treat today with this home tour!
 
 
Jen is the writer behind the iheartorganizing blog and she shares her incredible tips on organizing and she also shares her love of decorating her home on her website.
 
 
I am inspired by Jen in multiple ways, her organizing and cleaning tips are fabulous, her home is exciting to look at and to top it all off she is my "mentor" if you will when it comes to blogging. We have started to correspond via email and I am excited to be able to pick her brain when it comes to all things blogging. She is working on a blog post with tips and faq's about blogging right now too so if you are a blogger and have questions or if you want to start up, her post will be a great resource for that, so stay tuned to her blog for that!
 
Ok now on to the house photos....get ready to be envious! {in a good way of course!}


As I said before, Jen is an organizing guru. If you want to see more of her great ideas check out her projects gallery page!


I get all geared up to do projects after I read her blog posts! I am encouraged as a mom - that you can do these things with kids in tow and encouraged as a home owner that things do get better and better with time if you're willing to put effort into your home and that it is SO possible to DIY a lot of these cute things you see out on the internet. Organization is something I am trying to accomplish on a minute by minute basis when I am home so I will take and hoard in my little brain anything and everything I can get! Thanks Jen for taking the time to mentor me on this blogging thing that I have picked up as my new favorite hobby! Apparently I'm full of hobbies now, you know house plan hoarding and blogging. I live a crazy life ya know. Be jealous, be very jealous!
 
I hope you guys enjoyed seeing a few photos of Jen's house and if you didn't already click over to her blog to see more, you can click here to go there now!
 
 
Hope you had a Marvelous Monday!!