Saturday, November 30, 2013

{ Ripping up the bathroom | Part 2 }


We hope that you all had a wonderful and relaxing Thanksgiving! We enjoyed spending the afternoon with Mark's mom and dad, his sister Heather and his sister April and her family.  We had a fantastic feast, yummy desserts, and quality family time. After that we drove over to my cousin's house and got to see family there too, we found out another baby will be joining the family (yay!) and of course ate some more! We get to have Thanksgiving with my family tomorrow. 
SO thankful for our families!! 

We've worked on the bathroom a couple nights now.
This is how it looked the last time you saw it from this post.
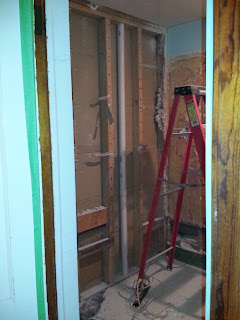
 Up next we had to tear out the other wall between the kitchen and the bathroom so that we can expand the bathroom a little more in that direction. 
I'm standing in the kitchen taking this photo. Hello bathroom!


Next, he ripped up the flooring and underneath was the original wood floor BUT it was all rotted. That had to go. 


Then the sub floor had to go too. That was rotted out as well. Oh these projects just keeping getting more complicated! 

Hello basement.


Today, it looks like this. New sub floor. 


 See the angle on the floor...that's where the new wall will be. 

Before we did the floor we placed the vanity and the tub in the room to get a feel for it. 

Here's a shot of it in the front room.


The tub is a rounded corner tub. We went with this to maximize the space in this tiny bathroom. It still has the covering on it so don't be fooled. We did not buy a blue tub. It IS white. 


The toilet will go next to the vanity. It will still be pretty tight but removing that closet and then expanding into the kitchen a little definitely gives us more space than what was there to begin with. 

We also decided to relocate the window now too.


All the windows in the house need to be replaced at some point so this one's time is now and with putting the tub in that corner there are about 2 inches of window in the shower space. To avoid moisture damage/issues we decided to relocate over to the left, more in the corner of the room. That way when you're sitting on the jon you will be able to peer outside. nice huh?!

Still lots to do in here but progress is happening. 
Somedays it feels like we will never move in to this house. Somedays when I look around and see all the things that need to be done I get stressed. But then I remind myself...we have a home. we have wonderful family and friends. we are healthy. we have a safe and cozy place to stay while we are fixing up our home. I cannot let myself get overwhelmed by such things. It will happen. Slowly but surely. Someday we will be moving in. That is truth. 


Thursday, November 21, 2013

{ Drywall is up }

The upstairs room is moving along nicely now. It took a long time to get to this point since everything needed to be replaced. 

Finally it's starting to actually look like a room. I am getting so excited to be able to decorate this space for the kids. Remember what it started out looking like? Dark. Lots of wood. Closed off. Gloomy. Muti-floor covered. The list goes on.


So here is a look at what the room is looking like now.


It's so fun to watch the upstairs progress. As you can see the drywall is all up but not finished yet. You can see the new window, the new outlets, the new can lights in the ceiling, the new sub floor...it's ALL new and looking so so so good! YAY hubby! 

Here is a quick run down of how it got from the first photo to now.

Gutted room.


Fixed the roof where the chimney used to be.


Moved the side walls out, lifted the ceiling, replaced bad electrical outlets, and removed and replaced all the insulation.


Created a new sub floor.


Replaced the windows.


Put up insulation on the walls and ceiling.


Built the wall surrounding the stairs and built the closets.


Hung new drywall.


Cleaned it all up and now we are ready for the drywall to be finished!


 I am probably the only person that squeals when I see these photos but it took a long time to get to this point and I keep envisioning what the room will look like for my two kiddos when this is done and I am jumping out of my skin to make it perfect for them.

I've already purchased a few things for up here that I am really excited about. I got two twin beds off craigslist that I plan on painting. We took a trip to Ikea and definitely spent some $ there on things for this space. I've also been busy visiting my fav shops on Etsy and making a bunch of purchases on there too. 

Stay tuned for the final results hopefully sooner rather than later! 


Thursday, November 14, 2013

{ Kitchen Progress }

Remember when I said I was hoping to finish priming and maybe even paint the kitchen cabinets? Well...the painting didn't happen and the priming was done for a minute but then I removed the cabinets from their places and was reminded the sides of them still need to be primed. But hey, I felt really accomplished for a minute! 

So here's some quick snaps of the primed cabinets


Then one night when I decided I should remove the cabinets so we could move them to where we wanted them to get a better feel for what we are working with. 

I really didn't even know where to start. I thought I could just start unscrewing and things would come apart. I forgot the counter top was holding it all together duh! So Mark gave a quick lesson on removing counter tops and I went to town. I had to remove the laminate surrounding the outside edge so that half inch or so wooden boarder could be pried off. 


From there it was just a whole lot of yanking and finally it was gone.


Next up was separating each section from each other and the floor. Again, a lot a prying to get that to happen. Mark helped remove the plumbing when it came time to do the one that the sink was in. 


It was there one minute and gone the next. We were left with some pretty nasty gunk underneath the cabinets too. Yay more grossness to clean up (sarcasm here). 

I was really trying hard to carefully pry those apart since we are planning on re-using them but I had a few oops spots. The good thing is that nothing that got damaged will be noticeable once we are done. 


Bottom ones are gone


Working on removing the uppers


Here is how it looks now. 


I moved them a million times to figure out exactly where they would work the best. We weren't sure if we would have room for an island but we decided we are going to make room. We took a trip to IKEA and purchased this table. It's a long, skinny table so hopefully between the island and the windows it wont be too tight. If we didn't do the island we would have only 5 lower cabinets, two of which are under the sink. Not cool. So thats why we are going with it. Crossing fingers that it all works out once its installed and everything is moved in. It will be cozy but thats ok! 

Here's a quick side by side for the progress up to this point. What do you think?!


So thats as far as we've gotten on the kitchen. The drywall upstairs is in progress still so when thats done we will start on the main floor and then the kitchen and bath will have a lot quicker changes happening then!

Thursday, November 7, 2013

{ Ripping up the bathroom }

Remember the tiny bathroom? 


I might have said this before, but literally, you almost needed to know what your business was going to be before entering. For example...if using the shower, you would want to undress prior to entering, walk right in, take immediate left and get in...or if planning on using the toilet you might want to turn around before entering, back up into the room and then proceed to sit down. It is THAT small. When using the john your feet would have to be on the shower ledge. No Joke. Seriously. Who designs a house with this small of a bathroom? Not cool people. 

We are going to do our best to make as much room as possible. Remember my list for this room? Here it is to remind you. We can now cross off two things! Whoo-hoo!


Bathroom:
  • open up the room a little by moving some walls
  • replace stand-up shower with a tub
  • replace the tiniest sink in the world with a vanity and sink top
  • replace the flooring
  • install ceiling light
  • paint
So we started with removing the mirror, sink, and shower. The shower is only two years old (When we removed it, we saw a little note on the stud saying shower install 2011, thats the only reason I know that factoid). It wasn't that bad of a shower but with only having one bathroom in the whole house and three little kids who need baths a tub is a must have. The shower that was in there was also extra large for handicap accessibility so replacing with a standard tub will gain us some space too. 


No more sink! We (and by we I mean Mark...so... whenever I say we you can read it as Mark, I'm just the one saying what to do lol) started removing the paneling too.

We had a crazy night when taking the sink out because Mark ended up hitting the water line pipe when he was removing the paneling. Typically it wouldn't have been a big deal to bump a pipe but it is a big deal to hit a very rusty old pipe, because they break. Water started spraying out all over. Mark had me put my hand over it but it was spraying so hard that it was still coming out all over the bathroom and all over me. He ran downstairs to shut the water off (which seemed like it took forever). Finally the water stopped flowing. Leaving me, the bathroom and the wood floor just outside the bathroom soaked. We had to laugh though because it was kinda funny! The mess wasn't funny just the whole craziness of the moment was funny. 

Here's a shot of the floor after we got it all cleaned up. You can still see the wood was a little wet. 


We ended it for that night. Enough craziness for one night. The next night's agenda was removing the shower. He first removed the side panels, the corner shelf panels and then the tub base. 


Anyone need a shower? We've got pieces that we would love to sell. We were able to salvage the base and the two corner wall panels. The normal wall panels didn't make it off the walls in one piece but if you are interested contact me. 

After the shower was completely out we started tearing out that cabinet just to the left of walking in the door. It was a pretty deep cabinet which is nice to have in a bathroom but with it gone we would gain a lot of room and really open up the room so it had to go. The photo below is of the cabinet almost removed. I am standing in the bathroom where the toilet previously sat, to give you some perspective. 


It's a pretty big mess right now, I didn't clean it all up before I took photos this time. 


Those were the ones before the wall came out and these are the ones after. Makes a huge difference huh?!
I am so excited to see changes in this room because the sheer size or lack there of in the bathroom was starting to make me feel claustrophobic. for real. 


We have a ways to go yet until it's functional but when walls start coming down it gets exciting! It's still going to be a small bathroom but this will help a lot. 

oh and here's a shot of the ceiling lights and new fart fan! 


All of the plumbing and electrical has to be replaced in here so thats up next on the to do list. That isn't exactly picture worthy so I will update you as soon as noticeable changes start happening again in here. 
Sorry the projects are all over the place. I wish I could show you from start to finish a whole room, but we're just not there yet. So for now, we are working on whatever we have time for. We have to save big projects for the weekends, so during the week we can only accomplish small projects.
The upstairs is almost ready for drywall so I am really hoping to show you some updates on that soon. The kitchen has had some progress and I will share that soon as well. Stay tuned...lots of changes are happening. Sometimes not as quickly as we wish they would, but things are changing and I am eager to share!