Sunday, June 7, 2020

EXTERIOR update


This little house has come a LONG way in the last seven years.  I haven't blogged in SO long have missed sharing on here so I sat down the other night and thought I'd do a quick little update on how the exterior of our house is looking these days. That photo above was taken just after we bought it in 2013. The photo below was just last week.


Those tiny concrete steps, uninviting squeaky door, uneven pathway and over grown plants needed to go. The front porch was sad. We ripped out the steps and foliage, cleaned up the trash and added a few plants to get by for a bit and got ready for a new concrete porch. 


It took a few years to get the concrete poured. If you live near me - you know!  Up to this point, we've replaced the windows, doors, lights, siding, roof, basically EVERYTHING on this house is new. 


Mark built the wood deck walkway so we wouldn't have to walk in the mud/dirt from our cars to the steps. That isn't staying. Once we have the garage added we will add a pathway from the driveway to the front steps. We also plan on adding a cute little railing and I'm on the hunt for a bench to put under the windows. I have to add more landscaping in front but I'm waiting on all the sand to be covered prior to working on that. I've had a few plants that were ruined with the construction work happening so it doesn't make sense to put more $ into landscaping.


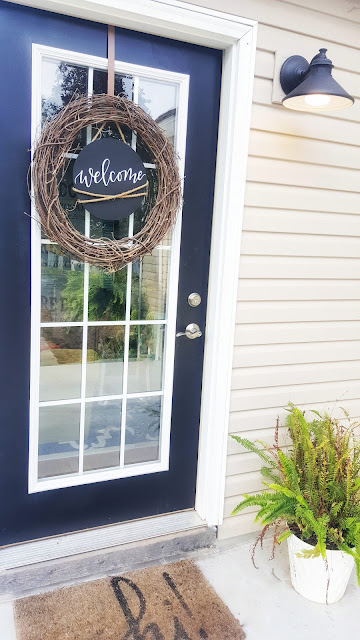
The black door and light make the house feel more updated. The welcome sign was made by Dana from  ByHisGraceCalligraphy. It's a much happier front doorway. 


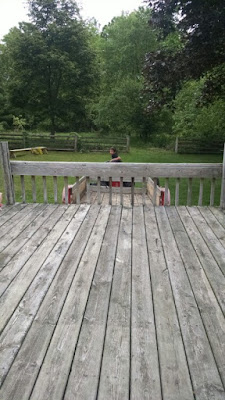
The backyard has seen some changes too. We replaced the old deck with composite decking and built some flower boxes. Mark hooked up the old deck to the 4-wheeler and pulled it away from the house (can you say redneck?!) 


The flower boxes are my FAVORITE! 


Mark and his friend Dave built a beautiful picnic table and it sat outside of these windows in the grass for four years.


This spring we made time to make a patio area. Mark played around on the digger thing (technical term I'm sure) and brought in sand/gravel and then pavers. Those pavers are 16x16 and we put 9 together to make a larger square with pea gravel to go in between. 


This is exactly how wanted it. Still working on completing some of the landscaping and we need to paint the brick on the bottom of the house since the paint peeling off. Mark needs to get up on the roof and take that random board down too. I have no idea why that is still there. We added a few privacy trees along the side to make it feel more intimate but not completely closed off. I'm thinking a few more plants and some string lights and this area will be perfect. 


You probably noticed from above that we have started on the garage/breezeway addition too. 


We finally have concrete poured in the breezeway/addition part so up next is WALLS! Hoping that starts very soon. We are adding a mudroom/master bedroom/master bath/ 1/2 bath/main floor laundry. It's going to make this house seem so much bigger and function better too. We've needed a mud room/entry space and this will make a HUGE difference for us. Especially in the winter months with all the boots and snow gear.  

With our slow track record, this addition may be finalized in 2030, we shall see. ;) Crossing my fingers (and toes) it's done by next year.


That old side door will disappear and there will be an opening into the kitchen between where the side door is now and that window. The window will be coming out too. I'll try to add the blueprints to my next post to help make more sense of it all for you! 

Hoping to blog a little more here and there with some of the updates that have happened inside. Until next time! Be blessed. 


Thursday, February 25, 2016

{ Fireplace Mantel makeover }

Apparently I am not the greatest at juggling three little kids, a full time job, a side gig, a home, everything else that life brings AND a blog because I haven't posted in eight months! yikes! It feels like it was only a few and then when I looked back I was like whoa.

We did make time to capture a new family photo this fall. I love this one!


These kids of mine have my heart.

photo credit Kety Studio


To be quite honest not many "big" things have changed around here. We spent the summer camping and playing outside endlessly. Winter slows things down in the "DIY projects" department plus we've just been busy. I mean we are all busy right, but for some reason I just haven't figured out how to do this full time working plus everything else thing. Like keeping up with laundry and meal planning has consumed my time and even then it seems like I am always behind and have at least 3 loads of laundry to do at any given time and scrambling at 6:30pm every.single.week.night to come up with a delicious, easy, quick, healthy, everyone likes meal (like that's even possible) ha! If you have tips for me please share. not joking. how do you do it?

One thing that we finally checked off the crazy long to-do list is our fireplace mantel! I figured I would check in to give you guys an update on that. I know you were on the edge of your seats to see it.

So here's a quick reminder of our sequence of events and it only took us a little over 2 years. We are fast.

 
I was like what is that piece of paneling sitting on top of that fireplace? who does that? Then we figured out why...there was a hole behind it so duh, that's why one would buy a piece of faux wood paneling and some trim to cover it up.
 
 
We took the vent grates off, cleaned them up, and sprayed them white. The lovely gold screen came off (eventually), the limestone mantel was removed, and the giant hole was covered up with drywall.


Mark started putting the wood up to trim out the fireplace. and that's how we lived with it for over a year.


I improvised on our tiny little ledge that I had to work with. so pretty, right?!

and then finally a fire was lit under one mans behind and the mantel was constructed.


I primed and painted and then it was finally complete. Now I just need to go shopping to pretty up the mantel just in time for spring!


I love it. The room finally feels much more completed with this done.


So much better than this...


I'm itching to get to hobby lobby and home goods to scoop up some good mantel décor. Here are my inspiration mantels.


This spring we will be starting on the exterior of our house and I am so ready for that. Have you drove by our house? Let me give you a reminder.


Pretty right?! ha!

That yellow has got to go. The wood trim is peeling and rotting, that's gotta go too. That front cement stoop is uninviting and tiny so a new front porch will be replacing that.

We are still debating on color. For sure I can tell you it wont be any version of yellow. I know I want a combo of vertical board and batten and vinyl siding. I will find time to share the process with you and I am sure if you live local you will be seeing all the progress as we go!

So maybe I am writing to myself since it's been so long since I've updated but honestly it feels good to blog again. It feels good to have a small thing checked off our list and it feels great to dream about the big exterior changes to come!

Be blessed!

Monday, June 22, 2015

{ Amazing Arabesque }

 
I am going to rap up the kitchen details all in one long post today since I am sure you are probably ready to be done talking about it and move on to something else, no?!
 
I literally have had SO MANY complements on the tile we choose for our kitchen. I know I said this before but truly I am IN LOVE with the kitchen and I think the biggest reason for the pure joy that I feel when I walk in there is that gorgeous beveled arabesque tile from Mission Stone and Tile.


This tile was generously provided to us by Mission Stone and Tile for the One Room Challenge that we participated in and I feel so blessed to be able to have their gorgeous product in my home.
 
 We started at the right end and worked our way up and then over. From there we filled in the gaps. We made a little video of how we attached the tile to the wall. You can see that post here.
 
I really was stuck on choosing what color grout to use and it really was helpful for me to paint the wall in my color options prior to putting up the tile. I mentioned this before in my post but honestly this is the BEST tip I would recommend if you are like me...aka...super in-decisive.
 
 
In the end, I knew the white was too plain, the dark gray was too busy and when I looked at the light gray, I heard angels singing, it was perfect! I know dramatic, right!?
 
Grouting is messy. Super messy but it only lasts a little bit and then you clean it up!
 
 
 The game changer for the whole look is when Mark filled in all the gaps, and edges with the caulk. If you didn't catch it in our reveal post, there was still a lot of caulking that wasn't completed yet. We just needed one more day and didn't have that but since then it's all been finished and it really completes the look, not to mention adding the outlet covers makes the whole project absolutely complete!
 
 
It wasn't hard for me to choose the style of tile that I wanted because I have been drooling over this arabesque tile. When I looked at Mission Stone and Tile's shop, I really fell in love with a few of their other options. If you haven't checked it out yet, make sure you click over to see their products.


A tile backsplash is a game changer for your kitchen, and for a small investment the improvement to your room is major!
 
The other project that we worked on that has really changed the function of our dining room. Fact is, our dining space is tight and cramped
 
Here is an old pic of what we were doing before.
 
 
 It's cute in all but to get into those chairs on the left side by the window took talent and coordination. They didn't scootch back and you really were trapped there until you were done because who wants to get in and out of that?!
 
Plus with the chairs back there we had to move the table further over toward the island which really made that aisle between the island and the chairs on the right side of the table very small. It was annoying to have more than our family eating at this table in this dining room.
 
Then we came up with the idea of the bench!
 
 
 Literally we use this bench every.single.day. My little guy prefers sitting on the bench to eat his meals and it's perfect for lining up a bunch of little butts when we have extra kids over.
 
The best part is, we can fold it down when we need more space!


Those little X shaped legs have hinges on them and fold right up into the bench so that it lays flat against the wall.
 
 
 We can push the table up to the windows and gain a lot more room. Those curtains really soften the room too. The whole thing turned out SO much better than I anticipated!


 So that's the last of the details on the kitchen update. If you happen to see something and have questions, please drop a comment and I'll make sure to give you the best details I can!
 
This room is truly the heart of our home and if you can remember again how it looked when we first looked at the house...shiver because it was bad...it's unbelievable sometimes that it's the same room to me!
 
How about a quick reminder??


 So much better!
 
 
 Thanks for sticking around through this whole kitchen update! I'm ready to show you a few more things I've been working on around the house lately so stick around, I promise it wont be kitchen posts for a bit anyway!