Wednesday, November 26, 2014

{ House Crash // Childhood Table Made New Again }

It's been awhile since I did a House Crash, so with the holiday tomorrow and being that most of us will be gathered around a table at some point during the day or over the weekend, I figured this would be a good one to share with you all. My sister's sister-in-law (did you follow that;)) has been so kind to share her story of her cherished table at her home here in Michigan and what cool story it is.
 
 
i have wanted a new dining table for awhile. i knew i wanted round + white with some different chairs. but was having trouble coming up with something reasonable. i was talking to my mom one day, and told her it was too bad she sold the table we had growing up because it would have been perfect!
well. lo and behold, she reached out to the people that she sold it to (they were friends) and they still had it. the only problem was, it didn't have the original chairs, the leaves, and it was taken apart, stripped, and sanded. i was thrilled. like seriously thrilled. they had intended to use it for a different project, but never finished it and were looking to just throw it away. they did alllll the hard work!
 
 
i painted it with the trim paint we had in our basement {free is always good!} i took it to the paint store just to double check with the professionals that it would hold up + they said it should. {so far, wear + tear from two babes and it wipes up great!} the two wood chairs were from target. the blue fabric chairs were a home goods find. i originally saw them + we passed them up. i went back a few weeks later and they were both still there. that NEVER happens at home goods, so i figured it was a sign they were meant to be mine!;) so happy with how it turned out! i think it really makes the space + i love that the table was my moms.:)


 I am in love with Abby's decorating style and how cool is it that she gets to have her childhood table in her own home! The kitchen has been called the heart of the home but isn't the table where you spend your time gathered together, eating-playing games-crafting-coloring-debating and everything else in between! What a privilege to have such a great piece of furniture with all those memories just to be able to keep making more of their own with their own family! I'm also drooling over those chair covers of hers. Maybe I'll get lucky one of these days and find some great slip covers for my own chairs! Thank you Abby for showing us your beautiful table and those two little cuties of yours too!!

As I prepare the few things I am making for tomorrow, I am thinking about all that I have to be grateful for this year, good health-healthy, happy and smart kids-a handsome and helpful hubby-the roof over our heads + the food in our bellies-my wonderful friends-our supportive and loving families...I could go on and on and on. With that being said, I also want to say I am so THANKFUL for you-my readers. I appreciate the time you take out of your day to read my ramblings and I am humbled each time someone tells me they enjoy reading my blog! I wish you all a very Happy Thanksgiving, time spent with those you love, reflecting on the things you have to be thankful for.

Tomorrow we plan to eat, drink, and visit with lots of family and then do it all over again on Saturday night. I'm really looking forward to eating baked beans, its one of those things we eat only a few times a year and Thanksgiving is one of those times! What are you looking forward to indulging in over the holiday??
 

Tuesday, November 25, 2014

{ Stenciled Curtains }

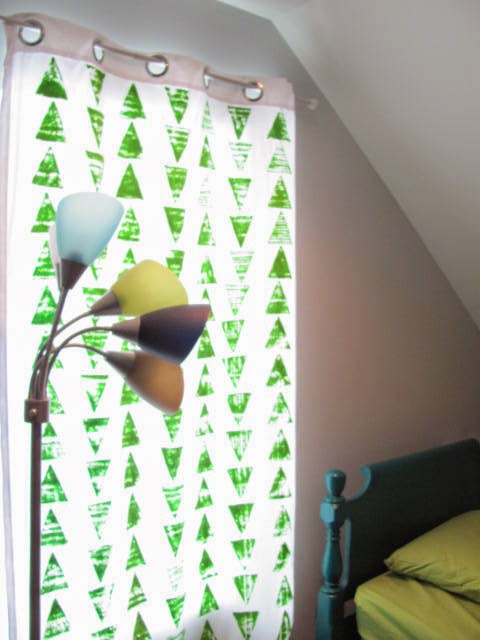
Over the summer I decided I wanted to try stenciling curtains. You've seen this all over on pinterest and blogs and it always looks really cool, so I wanted to see what I could come up with. I had an idea to do something with triangles. 

I really like vintage revivals triangle stamped wall so I wanted to try to copy that only onto curtains. 

I started out with a pair of Target's plain white curtains. 


I had Mark cut me a triangle out of some scrap wood. 


I taped on some fabric, fancy huh?!


I poured out the acrylic paint that I wanted to use and then dipped the fabric covered triangle into the paint and then pushed it down onto the curtain where I wanted it. 


I used part of a drinking straw to measure my spacing for each triangle. Really getting technical over here huh! 


I had laid the curtain out on the kitchen table to do the stamping. 

It was really easy. A little time consuming but not difficult to do. 


After I was done, I threw the curtain over the clothes line outside to dry. 

After it was dry, I hung them back up on the rod in the living room. 


I wasn't planning on having them in the living room, my plan was to do the stamping so that I could hang them in the kids room upstairs. 

I left them hanging in the living room for a couple months because I move slow like that and finally last month moved them up to the kid's room. 


I love them up there. They are perfect for the kid's room. The stamped triangles add a touch of whimsy and originality to an otherwise plain white curtain. I have yet to add anything to the wall behind the beds so it seems like these are the artwork that the room needed, for now. Obviously I am not a photographer so please disregard the terrible blurry photos. It's hard to get a good picture of windows in a dark room when it's bright outside. 


On the scale of easy-ness I would rate it at an 8.

Totally do-able for anyone. I rounded up a few of the "blogland" stamped things for you to see how original and awesome stamping  or stenciling can be. 

Rug

Completed curtains

MerMagHandStampedSwaddleBlankets0


Hoping to show you our completed shoe organization by next week so stay tuned. Thanks for reading and have a happy Tuesday!


Tuesday, November 18, 2014

{ Brrr it's Cold! Master Bedroom Update }


We've replaced many of the old windows in this house since we bought it back in Sep 2013. Some of them had to go due to being rotted right out, the upstairs windows were really terrible and were replaced right away. The slider and window in the kitchen and the bathroom window were all replaced as well. The bedroom windows on the main floor are old and really need to be replaced but they were in good enough condition that we decided to hold off a couple years on replacing those ones. They aren't pretty to look at but they get the job done...kind of. When it started getting colder out, I started noticing the major draft coming from the windows in our bedroom. We were cold at night and not because our furnace isn't working, it's mostly due to those darn old windows.
 
 
So to band aid the situation for this winter, we purchased some of those plastic window insulating kits. I've seen these used on older homes but I have never had any experience using them before.
 
 
Mark put ours on the inside of our windows right over those cheap blinds that were there when we purchased the house. We will replace those someday but it is not a priority at this point. I cannot tell whatsoever that there is a plastic layer in front of those mini blinds. I was afraid it would look terrible but not at all and the draft from the windows is practically gone!
 
If you haven't used these before, they are really simple to do. You lay the sticky part down along the sides, top and bottom. Use a blow dryer to seal it and voila! your good to go.


You can see a small portion of the plastic on at the bottom of the window but other than that no one would know there was plastic over these windows when looking into our bedroom. We don't open the blinds in here ever because the windows are so gross so that's why we did it over top of them, if you were wondering.
 
Next solution to help curb even more of the cold was to put up some curtains. I've been wanting to add curtains and this seemed like a great excuse to go out and get some now.
 
Here's the two corner windows after the plastic has been put up and prior to the curtains. See, you cant even tell the plastic is there!

 
I bought two cheap rods from Meijers, honestly I have no idea why anyone would spend a bunch of money on expensive rods, you can get some pretty cute ones for really cheap and if you don't like the color you can paint them. I've done that. It works and no one that I know walks into a room and checks out window rods and judges. And if someone did, I don't care to be friends with them ha! So cheap ones it is!
 
Because our windows are right in the corner, we decided to keep the decorative ends off in the center where they meet so the rods could be placed right up next to each other. It worked perfectly. You don't even notice that the decorative ends are missing. You do however, notice all the holes that need to be filled in the trim work, don't you. Ya me too.
 
 
Here's a close up of the corners coming together.


The decorative ends stayed on the other sides though, the curtains went up and it looks so great!
 
 
It was a good excuse to clean up my room a little, do some dusting and wipe down the dresser too so I figured I would show you how we've got the room set up. It's pretty small, a lot smaller that our first house's Master bedroom. It's not super fancy either, very simple, just how we like it. We have a king size bed so that makes things pretty cramped in here too, but we wont give up our king size, so this will have to work. 
 
 This dresser was given to us for free and I painted it. Looks pretty good for a cheap old dresser! I wish I had a before picture but it was painted prior to my blogging days.

 
We've never had a headboard for our king size bed. Hopefully this winter that will get checked off our list of to-do's. I've got a great idea for Mark to build one, shhh don't tell him, I haven't told him yet. He must really love me huh?! We also don't have king size pillows to fit out king size shams so they look a little droopy, that's just how they will stay too, I'm not picky. Most of the time our bed isn't made either but I had to make it look nice for you guys!


I hung up a few photos of our kids to the right of the window and I love having them there! I don't like to have every single wall filled with something so these simple three photos are exactly what I was thinking for this room. The middle photo is the Styrene mount option from unit prints. I use unit prints for almost all of my photo printing needs.
 
I centered them between the window and the open closet door. We keep that closet door open 100% of the time so it seemed weird to close the door just to center the pics, this works for me.
 
 
At the foot of the bed there's just enough room for walking and not much more. I put a small table there with our trash underneath. Eventually I would like to get a skinny long dresser to put there or maybe just a skinny bench but that seems like it would just be a spot to throw stuff so I don't know about that quite yet.

 
And that's it. Like I said, a very small room, but I think we've made the most of it and it works pretty well for us. I love the addition of the curtains. Having them hung up at the ceiling makes the room seem a lot taller which makes the room feel bigger too. Our master bedroom went from blah to really cozy with the addition of the curtains and the photos on the wall not to mention the sprucing up too. A made bed sure does make the room seem a lot nicer! I love simple updates that change the whole feel of a room!  Plus the added curtains when closed really help the cold from seeping in too.
 
 
There are more projects that I want to do in here. Nothing that will happen right away, and none of these projects by any means are important. They definitely hit the to-do WAY later list.
 
But...eventually I would like to have crown molding on the ceiling.
 
 I am still looking for a rug for in here. Not sure if I want to get a couple runners or get something large that will go under the bed as well. I hate stepping out of bed onto the hardwood floors but rugs are expensive and I want to make sure I get something I really like.
 
I would love to do something on the walls, I know exactly what I want to do but for now I'm going to keep that a secret because I am really excited to try this idea in my head out on these walls and show all of you. 
 
Like I said earlier, we will be building a headboard sometime this winter or early spring. 
 
The closet also needs some attention with more shelves to better organize and get the best use out of the small space that we have.  
 
I'm sure there are more changes/updates to do but I'll leave you with that for now! Hope you are having a fabulous Tuesday, and if you're local, enjoy the first snow day! My kids sure are!
 
 
 It's always so pretty but honestly I am totally NOT ready for snow yet! How about you guys?!


Thursday, November 13, 2014

{ Hanging Coats }

I took for granted that we had a closet at both our front door entry and our garage door entry at our last house. Closets are a NEED, not a want, or a nice option, they are a MUST HAVE, am I right!?
 
We don't have a closet anywhere near an entry in this new house of ours. None whatsoever. At first it really didn't seem like too big of a deal BUT then it started getting colder. The people in my house started to need to wear coats. You know no one has just one coat either and they ALL GET THROWN onto my bench near the side entry door and there.they.sit. All piled up like a bad dressing room that you don't want to go into.

The photo below is NOT an exaggerated "staged" photo by any means. It literally looked like this one day a couple weeks ago so I quick grabbed the camera because I wanted to show the chaos that is our entry way (if you want to call it an entry way, more like, a non-entry entryway that is part of the kitchen). This is not ok with me. I am not an organization freak but common, this is out.of.control!


Something needed to be done. It took a few weeks because we procrastinate like nobody's business these days but we got it done. Remember my post on color washing wood? I used those two pieces, screwed some hooks onto them, had my handy hubby hang them up and we are IN BUSINESS! (Sorry about the bad phone pic)

 
This entryway isn't my favorite. But we are making the best of it.
 
It's actually much improved from where it started out.
 
You got a small glimpse of the beautiful wallpaper that used to live in the back entryway  in this post in October 2013. Here's a visual reminder of that gorgeous paper.


I had amazing luck removing the wallpaper in the stairway going upstairs so I had high hopes that this basement stairway and entry would be the same. Nope. I tried peeling off a small corner and it wasn't moving. I knew it was going to take a lot of work to get that off and at the time I wasn't up for the task.
 
BUT my mom apparently was! She insisted. I have no idea why, I didn't ask her to do it, I didn't want her to do it, but she wouldn't take no for an answer. I love my mom. She literally picked and picked at that paper for weeks.


It took her many, many visits to get it all removed. Then she gave my dad the task of fixing the walls. Did I mention my dad is pretty awesome too?! He is.
 
 
He fixed it all up and then it sat like that until last week. I put a coat of paint on the walls and Mark hung the wood and hooks on the wall and I call it good.


We still need to replace the flooring. We have the stuff, just need to make the time to do it.


I also need to paint the trim that goes around the door to match the rest of the trim in the house. The light needs to get hooked up. And I would like to paint the door too but that will have to wait until warmer weather comes around again here in Michigan!
 
I know on the scale of awesome home reno projects this seems pretty lame but I am telling you my bench is now almost always clear of coats and other items. We still have a shoe situation but that is getting worked on as we speak so I will update you on that whole non-entry entryway as soon as it is completed.


What are you guys working on these days? I have been itching to get a few things crossed off our to-do list so I am hoping that you will see a few more posts from me very soon on those things!
 

Tuesday, November 11, 2014

{ A Cuff for YOU! }

 
**Update**
Winner of the Farmgirlpaints Cuff is #6 entry Rachel Mortensen!
Thank you to everyone who commented and shared!
 
Don't forget to check out Farmgirl Paints Etsy shop, she's only open through this Friday! Use code Kasey15 to get 15% off your purchase.
I have to tell you a little about my sister's story. I tell you, this girl is the strongest, kindest, most genuine, and beautiful person that I know. Hands down. I have truly been the luckiest to have her in my life and as my sister. She supports me in my goods and bads. She gets excited for me when I'm excited. She gives it to me straight when I need it the most. She is younger than me but wiser and way more mature. Her attitude and love for others is something I strive to have. I am blessed beyond descriptive words. If you know my sister you are nodding your head right now, aren't you. She truly is a fabulous person inside and out.

I mentioned a while back that she has been dealing with epilepsy now for many years. Almost her whole life really. She was diagnosed at age 8. Her medications were helping her live a pretty normal life for many many years but when she got pregnant with her twins back in 2012 life changed. Not only did she have to go on bed rest (not related to her epilepsy), but her medication was no longer maintaining her seizure free life. Long story short they went up with her doses until they couldn't go up any longer. She started having grand mal seizures (up to this point she was only have petite mal seizures). Her beautiful twins were born early because her body wasn't able to adjust to being pregnant with two and being medicated for epilepsy. We were all hoping that she would be able to go back to "normal" in regards to seizure activity and being maintained on medication. That didn't happen. She has since had multiple seizures both petite mal and grand mal, undergone deep brain testing, had her head shaved (more than once), participated in research for a deep brain stimulator (DBS), had a DBS implanted into her body/brain, gone without driving for over 2 years, and had multiple adjustments to her medications - ALL while being very brave and mostly positive oh and did I mention, raising twins! This girl is STRONG.


When she went for a month long testing earlier this year, in which she was in Ohio and separated from her family and her babies, enduring very painful procedures - I decided I wanted to get her a little gift. I really didn't know what to get her, I mean, what do you give to someone who is about to have their beautiful hair shaved and poked and prodded in an area (the brain) that most people would prefer to leave alone?
 
I came across these cuffs from a shop on Etsy (you all know my obsession with Etsy by now don't you?!) and decided this was perfect. It was a small gift with a great message. Something that she could wear that would remind her that she is loved and that what she is going through ... her road... her trial, that she can believe that there is a purpose in it all and that we are all here for her, supporting her in the ways that we can, walking beside her through it.


 Farm Girl Paints shop sells hand stamped cuffs and other items. They are one of a kind and absolutely beautiful. You get to choose the word or phrase you want to have stamped onto your cuff and so for my sisters cuff I chose the word "believe".
 
I shared the above photo on IG with the statement:
 
"Believe it's all part of God's great plan, Believe you are strong. Believe you story will encourage others."
 
I honestly believe that we go through trials in life to grow ourselves and to encourage others. We may not even know how our story has impacted someone else but I am here to say my sisters positive attitude and amazing strength through extremely tough situations in life has encouraged me. I know our stories are nothing alike. My body doesn't work the way hers works, I don't have to deal with having much of my independence taken from me by not being able to drive. I don't have to wonder when I will have a seizure next. But we all go through trials of life, we all have things that don't work "right" and the lesson I've learned from my sister is to rely on God through the tough times, putting my faith at the forefront through it and to remain as positive as humanly possible because otherwise we become terrible people that no one wants to be around, am I right?! I tend to lean toward a whiny, pathetic, whoa is me kind of person when things aren't going right. Most of us do. But ultimately truth is, we are loved, we are blessed with what we DO have, and we have a purpose.
 
I share this today for two reasons. 1. because these feelings that I have toward my sister are something I wanted to write down. I need her to know that she encourages me and through her story you may be encouraged. She shares a lot of her thoughts and feelings along with family and house news over on her blog A Twinell Life and if you are struggling with seizures, her words and insight may be comforting to you. Like I said she is far wiser than I and shares deep from the heart, a place I don't go to very often on this blog of mine.

and the second reason is to share about the lady behind the cuff and her shop. I've been reading Becky's blog - FarmGirl Pants - for quite awhile now. She's another one of those beautiful people that shares deep from her soul and you leave feeling lighter after reading her posts. I shared her "marriage advice to her girls" post on my FB awhile back because it was SO perfect and exactly what I would say to my daughter. Becky is extremely talented and artistic and started making cuffs for herself and after awhile was making them for lots of her friends and has naturally transitioned into opening up her own Etsy shop called FarmGirl Paints. See this post for details on all of Becky's new stuff that she's selling in her shop!


Her cuffs are adorable. Handmade, hand stamped, and original. She generously sent me this cuff and I've been showing it off to everyone who will look ha!


When I received it, the words -breathe- hand stamped on it were a perfect reminder for me to literally just take a breath in the midst of my crazy, fun, full, everyday life. We all need to be reminded of that sometimes, am I right?!

There's only one problem, I don't really wear a lot of accessories and this one needs to be worn because it's so cool, so... I am GIVING THIS CUFF away to ONE of you!


Here’s how to win….
PRIZE: (1) FarmGirl Paints "breathe" Cuff (as seen in photo above)
NUMBER OF WINNERS : (1) One
TO ENTER : Enter by sharing and commenting on THIS POST with “Shared!"
PRIZE SHIPS : Continental U.S.
 

Details: This giveaway closes on Monday, November 10th at 9pm. Only one contest entry per email address. The winner will be chosen using Random.org and will be announced in an update to this post on Tuesday, November 11th. I will email the winner directly for shipping information, so please make sure you use your regularly checked email address.

If you havent already, make sure you go check out Becky's shop on Etsy to see all that she has to offer. Her shop Re-Opened Yesterday and she's only open through the 14th of November, so get over there and see what you can find for yourself or for that special person in your life that might just cherish encouraging words to wear on a super cool and stylish cuff!


Disclosure:   FarmGirl Paints provided me with a Cuff for this post, but all opinions are 100 percent mine.