Friday, August 29, 2014

{ The Basement::Part 1 }


We are still working away on the basement. 

I thought we would get a little more done by the end of the week but that just didn't happen but as far as things go it does look like progress. Even if it is in baby steps. 

Here is what it looked like at the beginning of last weekend


A mess right?!
The wood hides a lot of the scary stuff. 
See this shot for a close up


Um...can we all together now say... GROSS!

I'm really not positive what all that is. It's probably 70+ years of grim and dirt combined with some mold and pealing paint maybe some dead bug bodies too, like I said I don't really know. Nor do I want to know.

We started off by emptying out the room.


Next, we took a bucket of water and mixed in some bleach and used a scrub brush to wipe down all the walls. The walls didn't wipe 100% clean but they did look a lot better.

We also cleaned up that old wash tub 

I took it outside and washed it all down with soap and water. Mark spray painted the legs so they weren't so rusty looking. Small improvements make a big difference. That tub was pretty dirty looking. 
Here is a pic before the scrubbing 


Here it is post scrub. A little stained in some spots but MUCH cleaner. 


If you are on your toes then you noticed the white painted walls in the before and after pic of the sink above. 

 We used the stuff you see below. It's supposed to waterproof the walls and help prevent mold and mildew which is exactly what we needed.


Now the room is looking like this


A fresh coat of paint does wonders for a space even in a dungeon basement!


I didn't get all the way down to the floor with the paint because it was still a little damp from washing the walls down. Plus the walls you see in the shot above that are painted, well that's ALL that's painted. Hence the angle in the shot. We still have another 2 walls to paint. I plan on working more on the painting over the holiday weekend.

 How's that for holiday weekend plans? Be jealous of my life! 

Speaking of the holiday weekend. Six years ago on this holiday weekend, I was in the hospital giving birth to our first baby. Literally laboring on labor day weekend ha! 

How can it be that 6 years has gone by already? How is it that my baby is now a big boy and starting first grade next week! I am so thankful for this caring, responsible, energetic, full of life, loving boy. I am one lucky momma!

We plan on taking some time out of our basement work to take this special six year old out for his birthday this weekend. I am looking forward to this time with him and to celebrate his day!

I hope you all enjoy the weekend no matter what your plans, work or play.
Thanks for reading and I hope to be back next week with another fun update! 

Tuesday, August 26, 2014

{ HOUSE CRASH - FUN FARMHOUSE STYLE }

Shannan's house and blog- Flower Patch FarmGirl are something you dont want to miss. This girl is encouraging and raw and real + her unique and fun farmhouse style is something that I envy.
 
 All over people are making over old junk and calling it their treasures and placing it in thier homes and making thier houses feel lived in and cozy and right. I'm not that kinda gal but I secretly want to be. So this house tour was fun for me to share with all of you and even though it's not exactly MY style of home that I have going on, I still take so much inspiration from these photos. Anyone that can make their home feel calm and cozy is inspiring to me.
 
You can see all the cool things that this girl has to offer over at her blog here.


I could see myself sitting down with coffee and a few friends and chatting it up in this living room for hours. It's different but somehow I love it, espcially that chair with those turned legs. Fact is, I swoon over furniture with turned legs.


I want one of these book shelf/shoe holding pieces like yesterday! How cool is that?


I like the fun bathroom hooks with letters above
 
 
Check out this kitchen...
 
 
I love the colored island and wood top paired with the white cabinets and subway tile. Modern and farmhouse style combined. 


These white walls with colorful curtains and pops of color throughout the room work well together and in my opinion just lovely!
 
 
Is that not one of the most cozy looking homes you've seen in awhile? Maybe it's not your taste but that's ok becasue that's why there are different styles out there, everyone is different.
 
I like it. A lot. I like to think that my house someday will feel this homey and airy - are those words? You know what I mean, right.
 
Like I said, Shannan's blog is something amazing. You will be encouraged. Maybe even cry a few tears while smiling as you read her words. If you want to read something cute you can see her love story here. This is honest love that she describes and I smiled through my tears as I read it because it reminds me of my own love story in a few ways....
 
So there you go. Another House Tour plus another blog to add to your reading repertoire.
 
I'll be back later this week with an update on the basement. It's getting there and I'm hoping that doing laundry in my own house will be happening real soon!


Saturday, August 23, 2014

{ DIY Fringe Scarf }

We just set off a bug bomb down in the basement. It's the first step to getting the rest of it done and I am beyond ready to get going on it. 

Here's an old photo from before we moved in. The old freezer with no door has been removed and its a whole lot messier down there now since this is where Mark had the table saw set up to cut all the trim and other boards for the upstairs renovations. 


Once we can get back into the house later we are going in with the shop vac and cleaning up the whole room. I'm hoping to not see any more spiders or other bugs down there anymore too. Those things freak me out!

After vacuuming we plan to spray the ceilings white, paint the walls with moisture lock paint and paint the cement too. This should really make it feel a lot cleaner. I'm looking forward to that. I NEED my washer and dryer installed into this house and it would be great to be able to go down there to do laundry and not be afraid that I will get some sort of disease or spider bite for that matter!

In the mean time, I decided to make up a few fringe scarves for Jenna out of some cheap tank tops I picked up from the Salvation Army Store. 

Have you guys seen these? They are so cute and really easy to make!
It's a cute accessory to a simple white t-shirt and leggings. 

You can find tutorials all over the internet but here's how I did mine

1. Cut off the bottom hem  
2. Cut a chunk out of the middle (doesn't really matter how big-I think mine was about 6 inches from top to bottom)
3. Cut fringes all along the bottom edge. You can go up as far as you want. I cut mine about 2 inches up. 
4. Pull on the fringes a little to get them to ravel a bit and then put it on

That's it! Seriously so easy, right?!

This girl of mine loves any accessory she can add to an outfit. She loves bracelets, necklaces...you name it, so giving her these quick and easy fringe scarves was the highlight of her day for sure!


I cut the fringes on this patterned one a little shorter and chunkier. It doesn't
 fringe out as much as the other one. I prefer the longer/skinnier fringe look, but this is still pretty cute!


So go out and find an extra shirt and make yourself one today for that extra accessory that everyone will ask...where did you get that?! Believe me... we went to the store with her wearing that last one and I had at least 4 people ask and was really proud to say "we just made it!"

Looking forward to sharing our basement pictures with you guys. I know that's real exciting in all but I will be excited so you'll be hearing about it none the less! Ha!
 Happy Saturday! 

Shared with Hope Studios
Shared with Inside Bru Crew Life
Shared with Nap Time Creations
Shared with Home Stories A to Z
Shared with Funky PolkaDot Giraffe

Tuesday, August 19, 2014

{ Let's PARTY! }

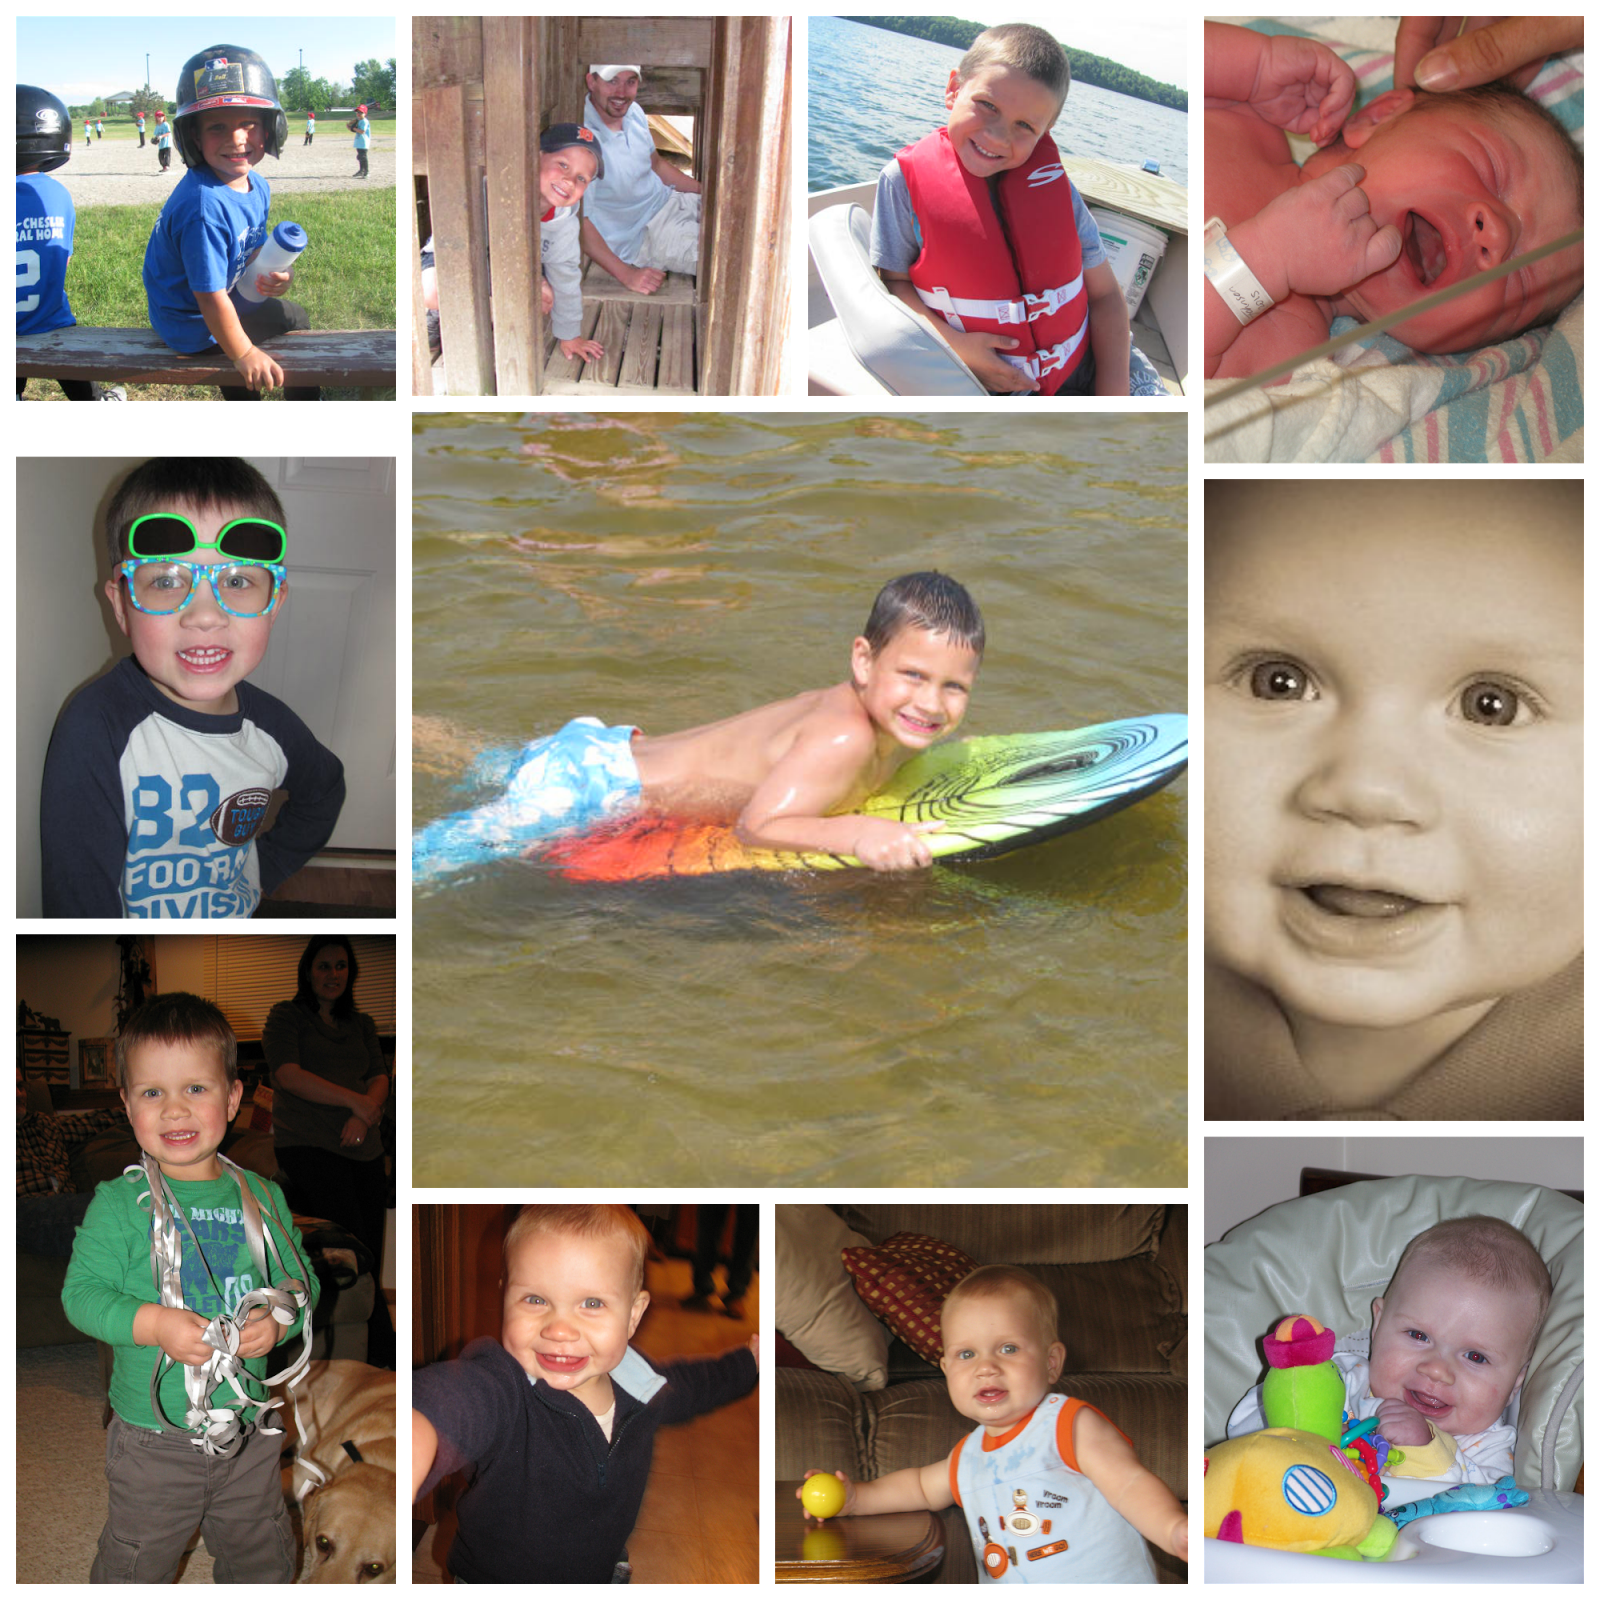
All three of our kids have birthdays this time of year. 

Jenna turned 3 last month


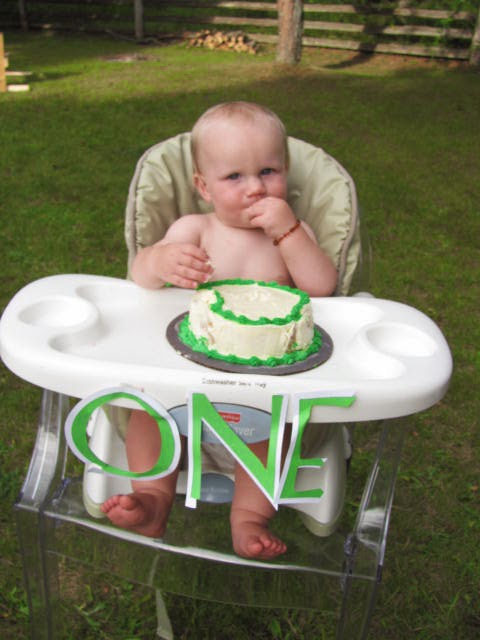
 and Chase just turned the BIG O-N-E! 


We had a small party for Jenna with grandma's and grandpa's from both sides and immediate aunts and uncles. I don't go all out for birthday parties like some people do. I love to see all these amazing parties and all the great decor that some of the bloggers that I follow do, but for me simple is better. Mostly because I don't have a lot of time and partly because I cant justify spending the dough for all the accessories and stuff that is needed for one of those extravagant shindigs. The biggest reason I would do those things would be for myself because I really do like to decorate and craft up cute things but these kids, for whom the party is for, could care less about what kind of cupcake toppers or banners or whatever is there to make the party beautiful they only care about the friends that are there and the cake of course!

So for Jenna's birthday, we just did a cake and ice cream party and I decorated the table with cupcakes and gluten free brownies, some beautiful hydrangeas, and a few of my favorite photos of our beautiful girl. 


She tries really hard to show three fingers but that third finger just doesn't want to stay up!

I made the little banner out of different colors of pink paper that I had in my crafting stuff and a little cupcake topper out of pink fuzzy craft balls and hung them from two skewers.

She loved her banner, which we actually hung up on her birthday and left it till the party a couple days later. She is all about cupcakes and all things desert so she was thrilled with the display of goodies on the table too. Like I said before, I'm sure if I had just layed the cupcakes down on the table and said we are having a party now she would be just as thrilled so really, the pretty part was because I liked doing it ha! 

Jenna is...
beautiful, smart, silly, feisty and sweet. 
She wants to go to school so bad and be just like big brother. She is a huge helper and a little momma. She is an energizer bunny, full of it all.the.time. She's our troublemaker and rule breaker. She brings true joy and lots of laughter to our family and we are blessed to be her parents!


For Chase's party we had all the same family members and we also invited our aunts and uncles too. Honestly, I could have not done a party and been totally fine with that, but how could I not have a party and then have him ask down the road, why his two older siblings had big first birthday parties and he didn't. That would happen, well, maybe that would happen and I would have no other excuse than the fact that I was being lazy! So...we had a small gathering in our backyard this past weekend.
For his party we did a taco bar- which is such an easy thing for a party and who doesn't like tacos?! If you don't there's something wrong! I kid. But really tacos are so.delicious!
I also made a cake which Mark and I decorated with fondant frosting (our first attempt at this) and I made banana cupcakes with cream cheese frosting -also delicious! 

We set up a Make Your Own Trail Mix station too which was a big hit!


I got almost everything from Gordon Foods. We had cereal, peanuts, animal crackers, m&m's, raisins, marshmallows, and pretzel sticks. I cut down some brown lunch sacks for everyone to have their own bag. Not only was it a hit with the kids but the grown-ups liked it too! 


The fondant frosting ending up being way easier to make than I thought it would be. I wasn't going to do it but Mark wanted to try it and prove me wrong that it was easier than I thought, and he did. We made marshmallow fondant copying a YouTube video that we watched! The little balls are rolled up fondant too. It was pretty tasty. Marshmallow fondant is the way to go if you want fondant.

The few details that we had were all DIY. 
I made garland to go across the windows above the table out of crepe paper.


This was extremely easy. Here's the breakdown
 
1. Measure out about 33 inches of crepe paper and fold it in half
2. Grab it at the middle and twist so you have about 2 inches of twisted paper
3. Loop the twisted part to make a circle
4. Cut from the bottom to get a fringe look

I used string and put it through all the loops and it was done. So cute and so easy. 

I also made the cupcake toppers and the cake topper circles using my friends cricut cutter. I used the cricut to cut out the happy too. Then I just glued them to some small popsicle sticks. 


Mark made some lawn games and a little obstacle course for the kids in the yard. I didn't get any pictures of them except for the giant marshmallow throwing at the bulls-eye. The kids all seemed to have a lot of fun running around the yard and playing + eating the marshmallows too!
Gift opening was eventful as can be for a one year old's party ;)
and Chase was all in for the cake smashing!

It was a great evening spent with family and friends! We sure are lucky to have such wonderful people to share our celebrations in life with and so thankful for them.


Our big guy is now weighing in at 24 lbs and 11oz and is in the 90th percentile for weight. He is the most smiley, happy, chubby, and easy baby. He has 6 teeth. No more bottles for this guy anymore. He loves to listen to music, play with his brother and sister and anyone else for that matter. He says dadda all the time and momma only once in a blue moon. He goes up and down stairs and walks all over the furniture, has taken three steps but wont walk more than that yet. 


How fast time goes. It really only seems like yesterday that he was born. 

We are blessed to have these sweet kids of ours. We will be celebrating Trevor's SIXTH birthday in a couple weeks by going to a baseball game, at his request. He is excited and we cannot believe our little guy is going to be 6. Talk about time flying. 


Happy Tuesday everyone and hope you are enjoying these last few weeks of summer before school starts up again!


Tuesday, August 12, 2014

{ Going Mint + GIVEAWAY }

UPDATE:
The WINNER for this giveaway is entry #3!
Congratulations!


I finally decided on what color to paint the bathroom mirror. 

I get a lot of messages and emails with suggestions and want to say thank you for that. Thank you for taking a moment out of your day to let me share my house and life with you and thank you for taking the time to walk beside me with your suggestions and input. I really value others ideas and it has helped me make a lot of decisions in regards to my home!

 It was one of you that suggested mint as an accent color and after I tested out a few other options I kept going back to mint as my number 1 choice. So I went with it and boy am I glad I did.


I ended up using craft paint mixed with some chalk paint on the mirror. I had white chalk paint that I picked up from Pinky's Place. {Side note: If you haven't checked out Pinky's Place on Alpine in Walker it's pretty cool + they carry chalk paint.} So after I picked up some mint colored craft paint, I just mixed the two in a 1:1 ratio.


I wiped down the mirror with a wet wipe -high tech, I know but this is what I learned from a chalk paint class and it works great! I let it dry and then painted it with a small craft brush


I didn't tape anything either. It's so much easier to scrape off the mirror after you paint than to take the time to tape everything off, especially one like this one that has curves to it. 

It took me about 30 minutes to paint, let it dry, and then paint it again a second time. After two coats it was good enough for me and then I hung it back on the wall. This was a super quick and easy change for the bathroom.


Do you like the mint? I LOVE it! Also, just a little fun fact for you...that green/blue vase that now sits on the bathroom counter, which I think is a really unique and cool vase, was a wedding gift from the woman who used to live in this home prior to us. She said she had it for a long time and was re-gifting it to us and now it's made it's way back to it's original home. Ironic huh?! 

We also added a toilet paper holder and some towel hooks. These things were necessary and should have been done right away but we finally rolled around to getting it done last week. 


I also put shelf liner in the drawers and cupboards in the vanity. I wanted to do this for two reasons. First to make sure the vanity was protected from water/liquid spills and second it's cute -duh, haha! I initially purchased a cheap roll of shelf liner from the grocery store and intended to put that in there but then I got the opportunity to get a roll from www.chicshelfpaper.com to use. They so kindly sent me a roll of adhesive vinyl laminate liner and I have to say this stuff is pretty awesome! Do you guys use shelf liner? I never did before but in our last house some of our bathroom vanity drawers got some water spills in it from kids throwing their toothbrushes or wet hairbrush in and the "wood" drawer got a little soft. I knew I wanted to keep these drawers safe from that especially now that we added another kid to the mix to make messes! 

Here is the pattern that I picked out. 


It comes in a large roll, so if you have a small vanity like mine one roll will be more than enough. 


It comes with easy directions and a credit card sized piece to use to flatten the liner down as you lay it on your shelf.
 
You will also need a ruler, a measuring tape, and scissors. 


It was so easy! You have to start with a clean shelf or drawer. Again, I used a baby wipe to clean them first and went over it with a lint free towel to dry. After you measure and cut your piece, step two is to peel the backing off and place the liner into position in the drawer. The backing is self-adhesive and is really easy to re-position if you need to adjust the placement. Step three is to smooth out the liner so there are no bumps or humps. 

I think the hardest part is cutting out the size piece you need and even that is not hard so all in all, I would say this update is totally worth doing to save on your drawers and of course to make them pretty too!

Chic Shelf Liner offers over 350 different designs and has four different material options to choose from. I really love the vinyl laminate material that my liner came in. The water drips will pool right up so they can be wiped away allowing my drawers to be completely covered from getting water on them and should I decide to change my colors in my bathroom, which I wont but in the event it could happen, I can easily peel up the liner and change it out for a different design. 

Head over to Chic Shelf Liner's webpage to check out all their different options for your home. They even have a cut to size service so if you would prefer to measure your cabinets and drawers and have them cut it all out for you they will do that! So cool right!

I would say this bathroom is really getting there in terms of feeling done. I still need something for the window, something above the toilet (not sure if I want to do pictures or shelves), and a towel bar (forgot that when we picked up the other stuff). 


Overall, I would say that I am really loving this bathroom! The mirror looks great, the inside of the cabinets look cute and are more organized now and we are still loving the large corner shower/tub and that adorable shower curtain too!

Speaking of the shower curtain...were you wondering when you would get to the giveaway part of the post?
HERE IT IS! 
Win your very own Target Threshold Shower Curtain!

Share this post on any social media site i.e. facebook/twitter/pinterest/instagram using the hash tag #rawhouseprojectgiveaway and then comment on this post where you shared and your email address. 


Details: This giveaway closes on Sunday, August 17th at 10pm.  Only one contest entry per email address.  The winner will be chosen using Random.org and will be announced in an update to this post the following Monday morning. We will email the winner directly, so please make sure you use your regularly checked email address.

Thanks for stopping by and if you haven't already check out Chic Shelf Liner's webpage make sure you click over to check it out now, I am telling you this stuff is great! 

Disclosure:   ChicShelfLiner.com provided me with product for this post, but all opinions are 100 percent mine.